Create a Daft Punk Inspired Text Effect
Step 1
Download the first texture from today’s Texture Thursday: Black.
Paste this into a new document, and resize your document to be 600px wide.

Step 2
Now create a hue/saturation adjustment layer.
Hue/Saturation Adjustment Layer Settings:
Hue: 0
Saturation: 0
Lightness: -80
Saturation: 0
Lightness: -80

Step 3
Now create a new layer called ‘radial gradient’. Create a white to transparent radial gradient in the center of your canvas.
Then change this layer’s blend mode to ‘overlay’.


Step 4
Now go to filter>render>clouds to render some clouds.
Call this layer ‘clouds’. Then reduce it’s opacity to 30% and change it’s blend mode to ‘overlay’.


Step 5
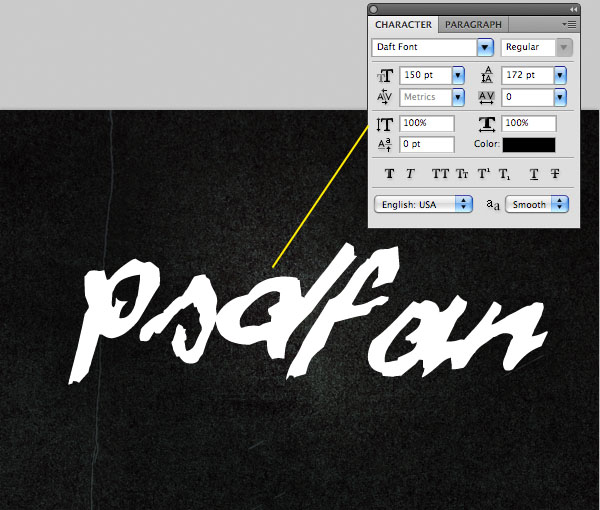
Now download this great daft punk font.
Type out some text in the center of your canvas, making sure to use white text. Then go to edit>transform>rotate and rotate your text by 5 degrees.
My Font Settings:
Font Face: Daft Font
Size: 150pt
Kerning: 0
Color: ffffff (white)
Size: 150pt
Kerning: 0
Color: ffffff (white)
Step 6
Now we want to add a chrome-type effect to our text. Luckily we can achieve this via a combination of layer styles! Go to blending options for your text layer, and apply a drop shadow, inner glow, bevel and emboss and satin blending option:
Drop Shadow Settings:
Color: Black (000000)
Blend Mode: Multiply
Opacity: 100%
Angle: -30
Distance: 5px
Spread: 0%
Size: 10px
Blend Mode: Multiply
Opacity: 100%
Angle: -30
Distance: 5px
Spread: 0%
Size: 10px
Inner Glow Settings:
Blend Mode: Normal
Opacity: 70%
Color: Black (000000)
Choke: 0%
Size: 4px
Range: 50%
Jitter: 0%
Opacity: 70%
Color: Black (000000)
Choke: 0%
Size: 4px
Range: 50%
Jitter: 0%
Bevel and Emboss Settings:
Style: Inner Bevel
Technique: Smooth
Depth: 20%
Direction: Down
Size: 10px
Soften: 0px
Angle: -30
Altitude: 25 degrees
Contour: Gloss Contour (anti-aliased)
Highlight Mode: Screen (white – 100% opacity)
Shadow Mode: Multiply (030a0e – 80% opacity).
Technique: Smooth
Depth: 20%
Direction: Down
Size: 10px
Soften: 0px
Angle: -30
Altitude: 25 degrees
Contour: Gloss Contour (anti-aliased)
Highlight Mode: Screen (white – 100% opacity)
Shadow Mode: Multiply (030a0e – 80% opacity).
Satin Settings
Blend Mode: Multiply
Color: 06293f
Opacity: 10%
Angle: -125 degrees
Distance: 10px
Size: 20px
Contour: Gloss contour (invert)
Color: 06293f
Opacity: 10%
Angle: -125 degrees
Distance: 10px
Size: 20px
Contour: Gloss contour (invert)


Step 7
Now duplicate your text layer, and move the duplicate beneath the original in your layers palette.
Then right click on your layer and click ‘remove all layer styles’. Now apply a color overlay blending option (black).
Then use your keyboard cursors to shift this layer 3px down and 3px to the right.
This creates an artificial drop shadow. However, the shadow is a little harsh at the moment. To fix this, go to filter>blur>gaussian blur, and apply a subtle 1px gaussian blur.
Color Overlay Settings:
Color: Black (000000)
Overlay: 100%
Overlay: 100%


Step 8
Now duplicate your shadows layer, moving it below the original. Move it 3px right and 3px down so that it’s visible.
Again, clear all current layer styles, and then apply an outer glow, inner glow and gradient overlay effect.
Outer Glow Settings:
Blend Mode: Overlay
Opacity: 100%
Color: ffffff
Spread: 2%
Size: 5px
Opacity: 100%
Color: ffffff
Spread: 2%
Size: 5px
Inner Glow Settings:
Blend Mode: Overlay
Opacity: 100%
Color: ffffff
Choke: 0%
Size: 5px
Opacity: 100%
Color: ffffff
Choke: 0%
Size: 5px
Gradient Overlay Settings:
Blend Mode: Normal
Opacity: 100%
Gradient: Default rainbow gradient available in gradients panel
Style: Linear
Angle: 180 degrees
Opacity: 100%
Gradient: Default rainbow gradient available in gradients panel
Style: Linear
Angle: 180 degrees


Step 9
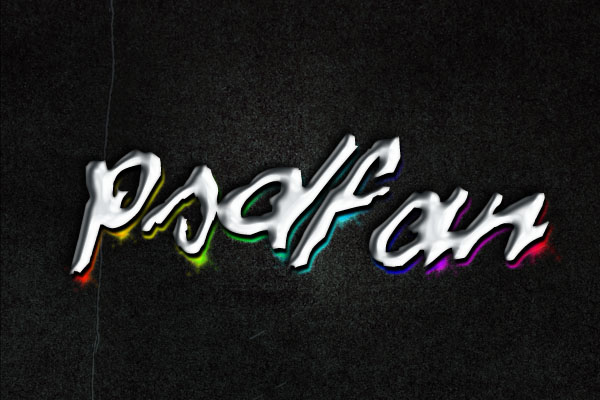
Now with your lighting layer selected go to layer>apply layer mask>reveal all. Then use a medium sized black paintbrush to mask off various areas of your lighting. You want to particularly mask off the top parts of your letters, and the edges should fade out nicely:

Step 10
Create a new layer just above your lighting text layer, but below your drop shadow text layer. Call this layer ‘stars’.
Now download this great brush set 1000 stars.
Grab a suitable star brush from the set, and start applying star marks over the edges of your text lighting. To match your star color to each part of the lit area simply use your eye-dropper tool.
Then hit option+e to merge this large down with your lighting layer.

Step 11
Now create a new layer called ‘lighting highlights’. Create a series of small radial gradients (white to transparent) over certain areas of your lighting colors. Then change this layer’s blend mode to ‘overlay’, and reduce it’s opacity to 50%.

Step 12
Now create a new layer above all of your previous layers called ‘splatter effect’.
Create a series of circles around your text using your elliptical marquee tool. Make sure that all of these circles are filled with white.

Step 13
Now go to filter>distort>ripple. Apply a ripple of 100% strength. This will make all of your white circles a more natural, random shape:


Step 14
Now copy/paste the layer styles from your main text layer onto your ‘splatter effect’ layer. This should give your splatters a chrome effect. If needed reduce the strength of your bevel effect:

Step 15
Now use the technique that you used previously to create a lighting effect for your splatters. Duplicate your splatter layer, move it below the original, and then copy/paste the layer styles from your text lighting layer:

Step 16
Now apply a gradient overlay adjustment layer, choosing the default rainbow gradient that you used on your lighting effects.
Then reduce this layer’s opacity to 5%.


Step 17
Now apply a final levels adjustment layer just to add more impact to your image:
Levels Adjustment Layer Settings:
15 / 1.00 / 250

Step 18
Finally, I chose to touch up my text a little bit more.
Select your text layer and go to filter>artistic>plastic wrap.
Plastic Wrap Settings:
Highlight Strength: 20
Detail: 15
Smoothness: 15
Detail: 15
Smoothness: 15


And We’re Done!
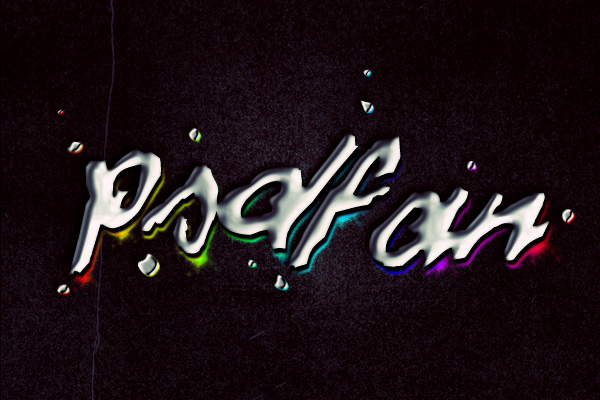
You can view the final outcome below. I hope that you enjoyed this tutorial and would love to hear your feedback on the techniques and outcome.

Create a Daft Punk Inspired Text Effect
![]() Reviewed by Unknown
on
4:43 AM
Rating:
Reviewed by Unknown
on
4:43 AM
Rating:


No comments: