How to Create a Fantasy Photo Manipulation with Fire
Learn, how to make this fantasy, warm photomanipulation from free stock images. You will know, how to combine background in your photomanipulation, then you will make shadows and lights, then you will create special effects – like particles or glows.
In this tutorial you will learn basics of Adobe Photoshop – using layers and basics of drawing – by making light and shadows in this photomanipulation. I will show you, how to work with perspective and how to use different layer styles. Sounds interesting? Read this tutorial and find out how easy it is!
Step 1
Let’s start. Create new file. Go to File > New… and pick 1200x1800px size.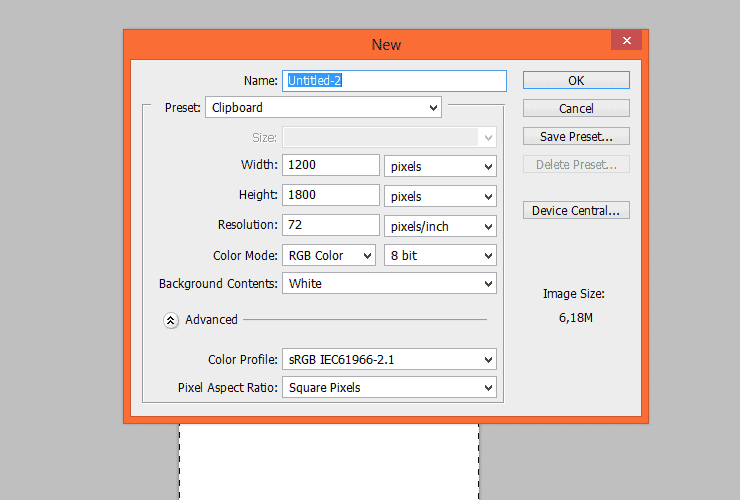
Step 2
Place and transform “Stairs stock”. Drag it from your folder and drop to created file.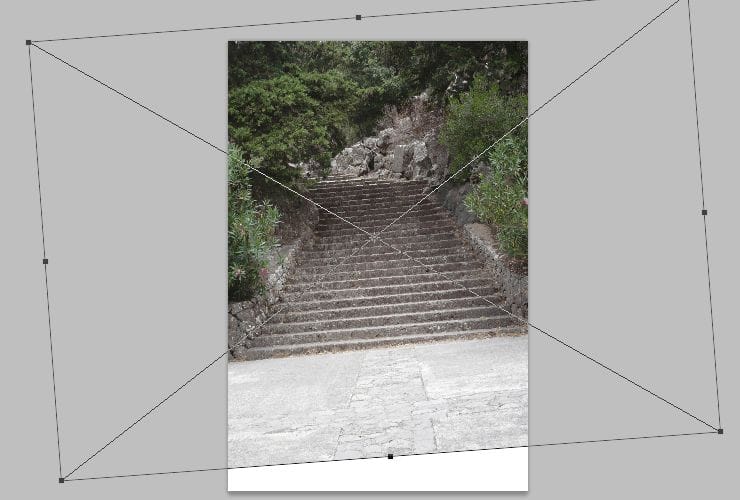
Step 3
Then, place “Grunge map”. Transform it (ctrl+T) perspectively, by holding ctrl when you drag points of transform.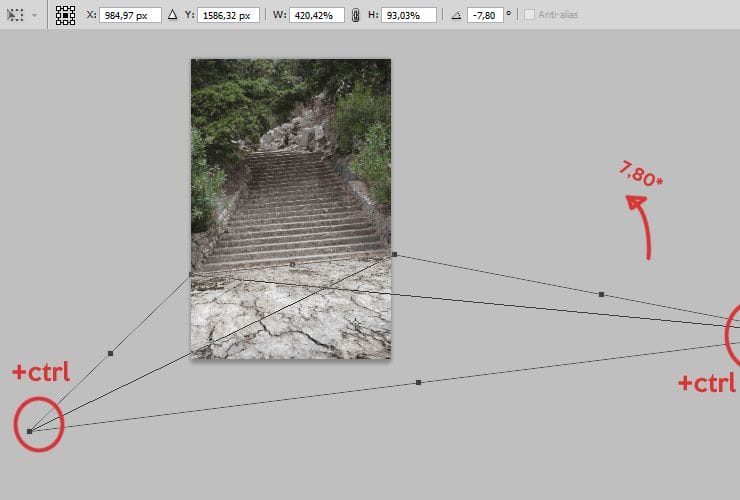
Step 4
Add mask to this layer. Click on marked shortcut. Then, choose white canvas next to layer thumbnail. Pick soft round brush and mask edge of texture.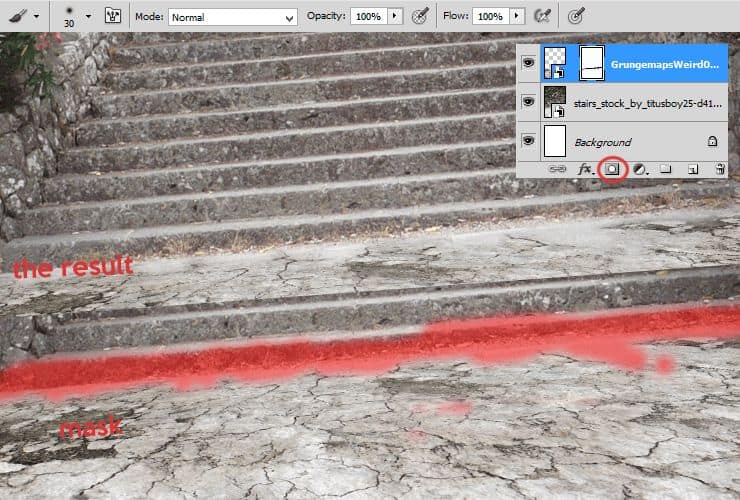
Step 5
Let’s place “Stolpen 11” stock. Transform it(ctrl+T) perspectively, by holding ctrl when you drag points of transform.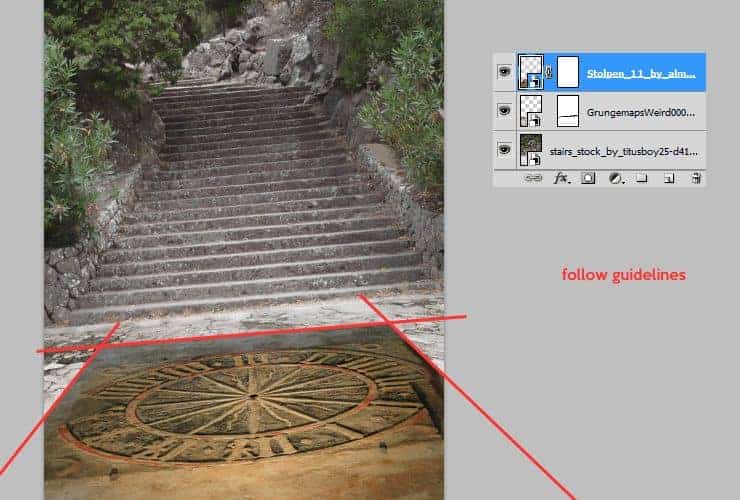
Step 6
Click on marked shortcut. Then, choose white canvas next to layer thumbnail. Pick soft round brush and mask everything except circle of clock.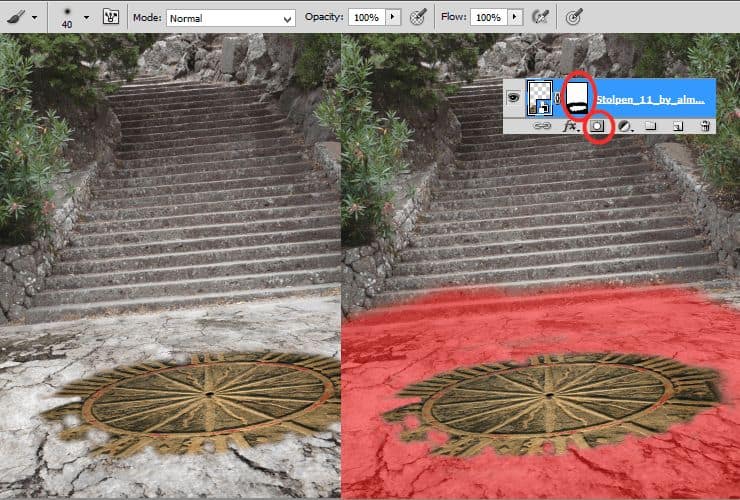
Step 7
Add some lights and shadows to clock. Add Brightness/Contrast adjustment layer. Right-click on adjustment layer and choose “Create clipping mask” (Alt+Ctrl+G or Layer > Create Clipping Mask). Set it as is shown.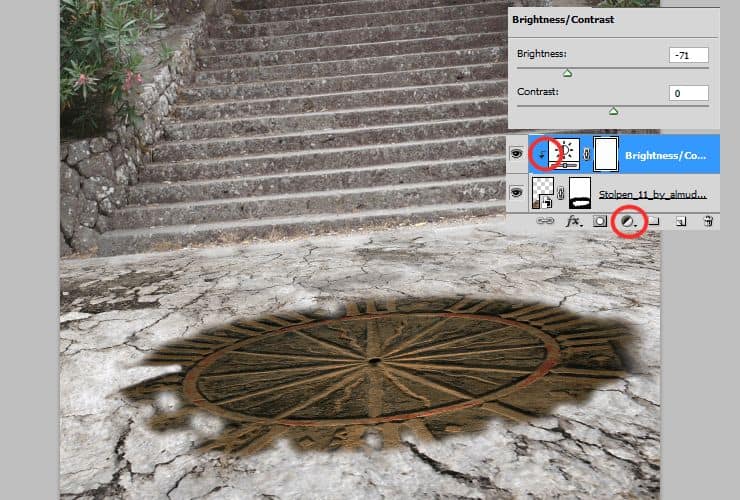
Step 8
You can mask adjustment layer, just like normal layers or Smart Objects. Click white canvas next to layer thumbnail. Pick soft round brush and mask top of the image.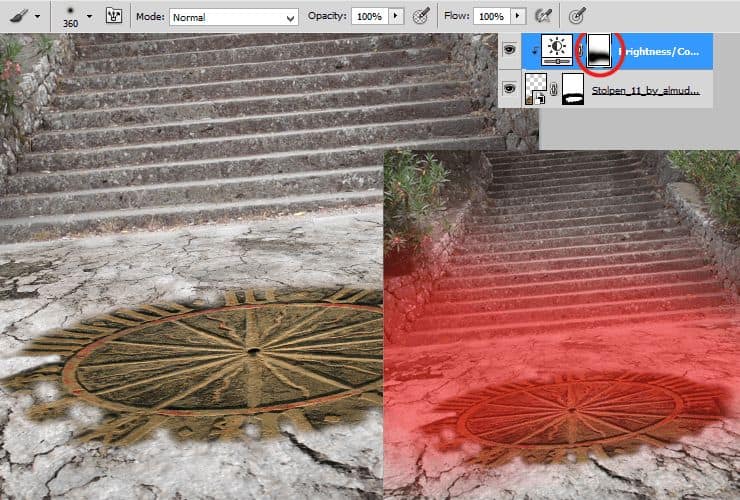
Step 9
Adjust whole stock image to texture on the ground. At first you should decrease saturation. Add Hue/Saturation adjustment layer. Right-click on adjustment layer and choose “Create clipping mask” (Alt+Ctrl+G or Layer > Create Clipping Mask).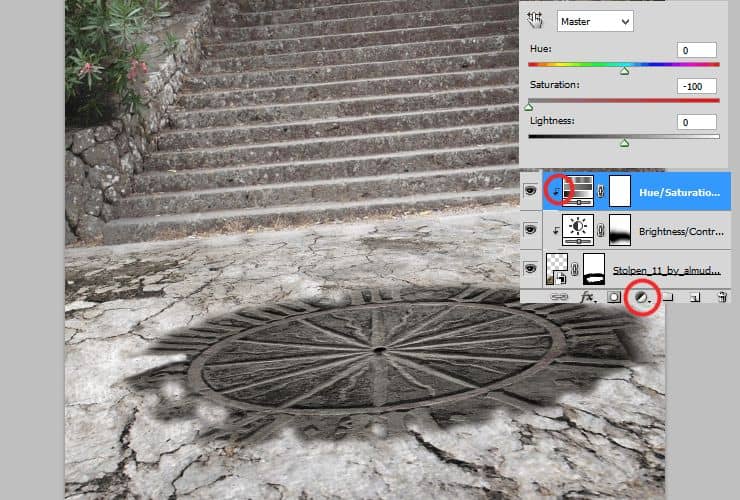
Step 10
Decrease contrast – stock with clock is too contrasted in comparison to ground texture. Add Brightness/Contrast adjustment layer. Right-click on adjustment layer and choose “Create clipping mask” (Alt+Ctrl+G or Layer > Create Clipping Mask).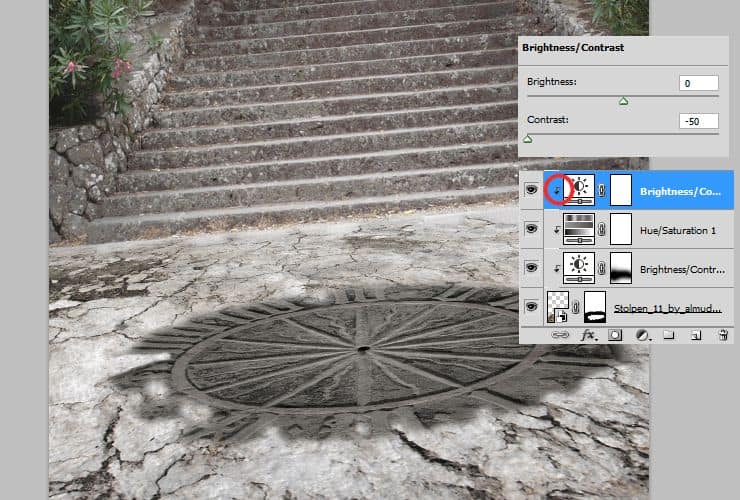
Step 11
At the end, add again Brightness/Contrast adjustment layer. Right-click on adjustment layer and choose “Create clipping mask” (Alt+Ctrl+G or Layer > Create Clipping Mask).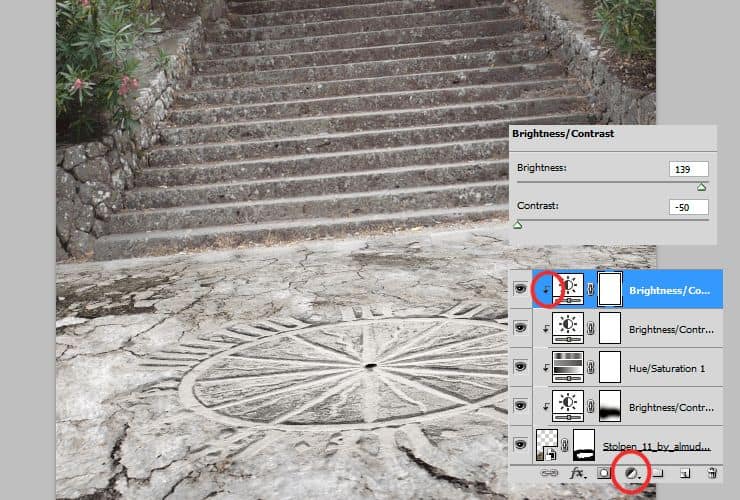
Step 12
Adjust whole background. Add Brightness/Contrast adjustment layer.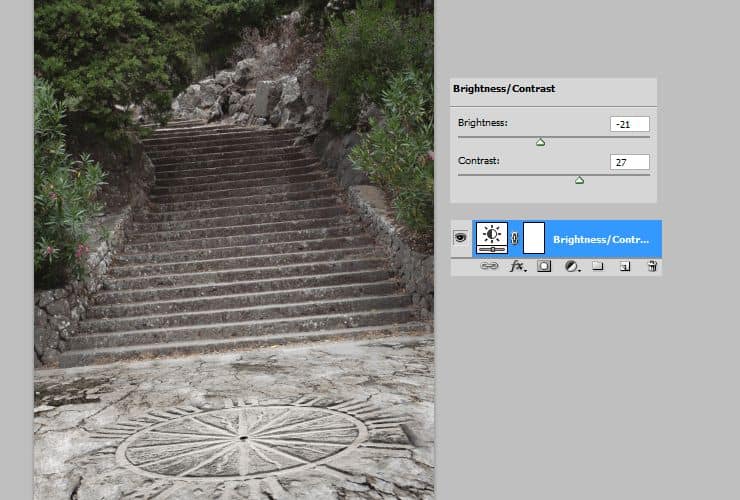
Add again Brightness/Contrast adjustment layer. Then, by using mask (white canvas next to layer thumbnail) and soft, big brush erase first plan of background.
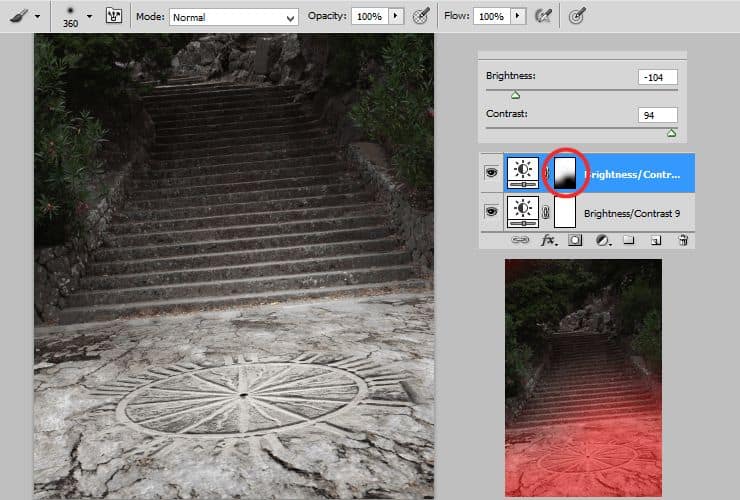
Add some colors. Add Color fill adjustment layer (Layer > New adjustment layer…) and set color of fill to #18bc7c. Then, change blending mode to Pin light. Decrease opacity around 40%.
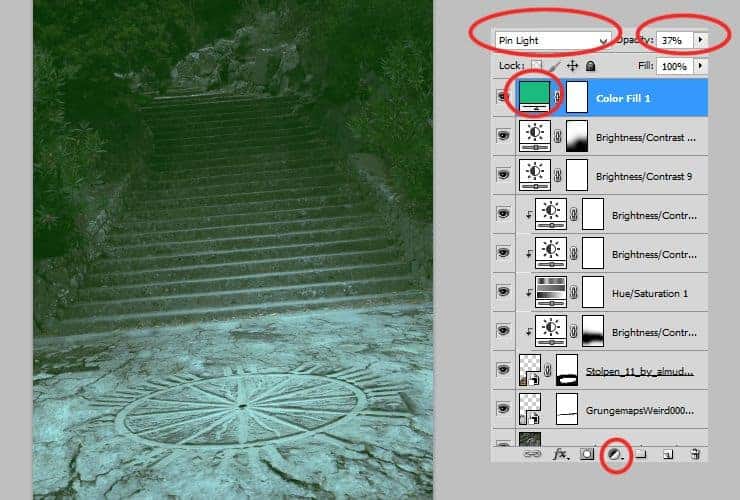
Duplicate color fill layer. Drag it and drop to “New layer” symbol or go to Layer > Duplicate layer…. Change blending mode to Hue and decrease opacity to 80%.
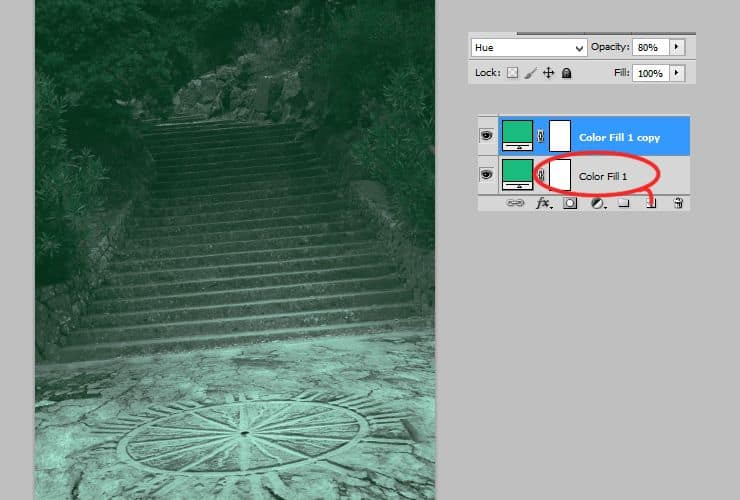
Add again Brightness/Contrast adjustment layer. Then, by using mask (white canvas next to layer thumbnail) and soft, big brush erase last plan of background.
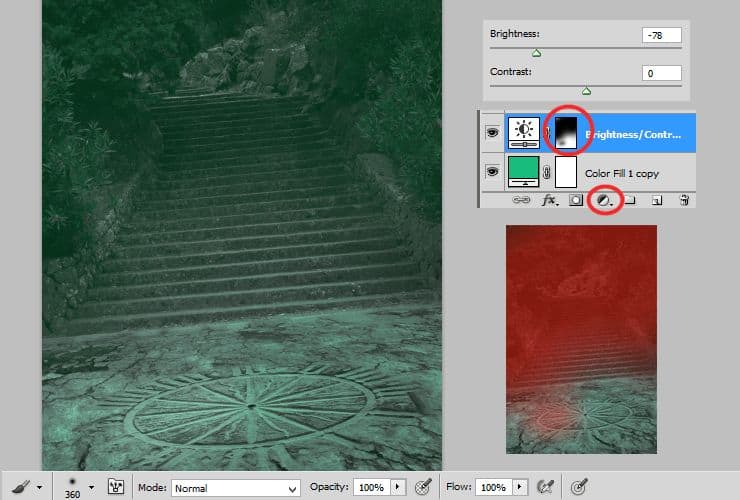
Duplicate this layer (Layer > Duplicate layer… – or drag and drop it to “New layer” symbol) and change duplicated Brightness/Contrast, by clicking on it twice. Decrease brightness. Then, decrease opacity of this layer to around 40%. By making this step you can simply duplicate layer and layer mask without repeating all steps.
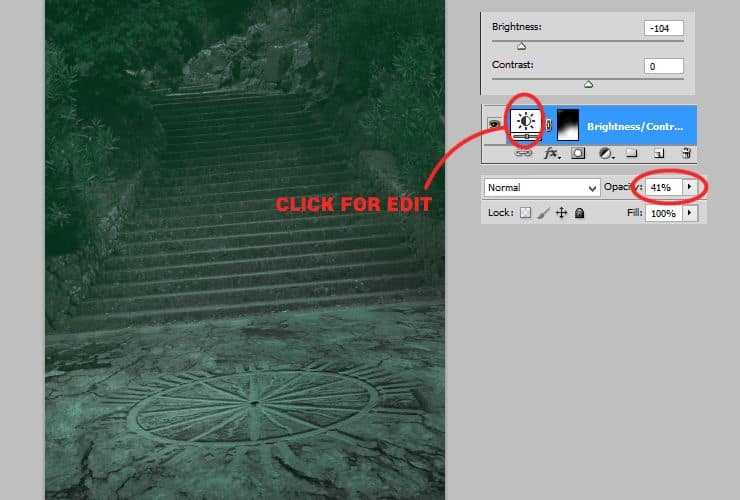
At the end, you should mark ligher parts on the picture – here: small dot on ground, where fire will glows. Add Brightness/Contrast adjustment layer (Layer > New adjustment layer…) and set it as is shown. Then, mask part which should be lighter. Use soft round brush.
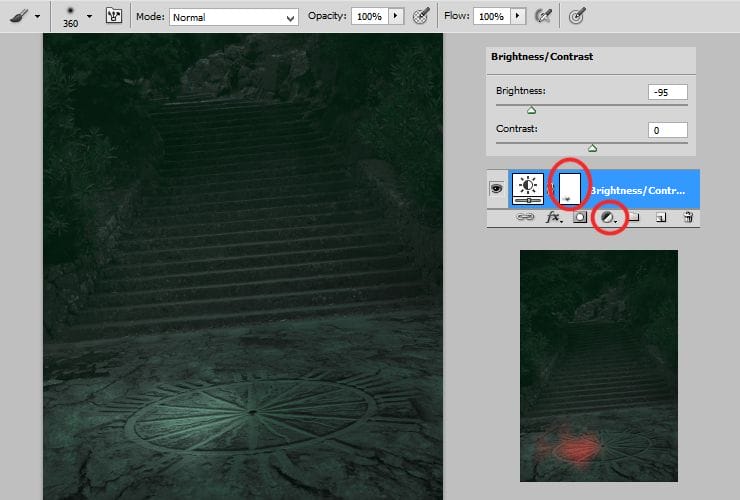
Step 13
Place model stock. Drag it from folder and drop to your file. Use hard round brush to mask details and body shape.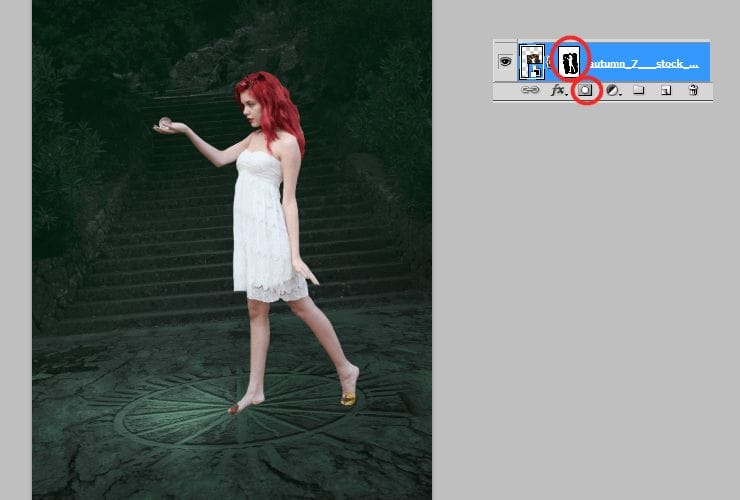
Step 14
Erase leafs on feet. Add new layer. Right-click on layer and choose “Create clipping mask” (Alt+Ctrl+G or Layer > Create Clipping Mask). Use clone stamp tool and erase leafs. Click with alt to make source, then click where leafs are.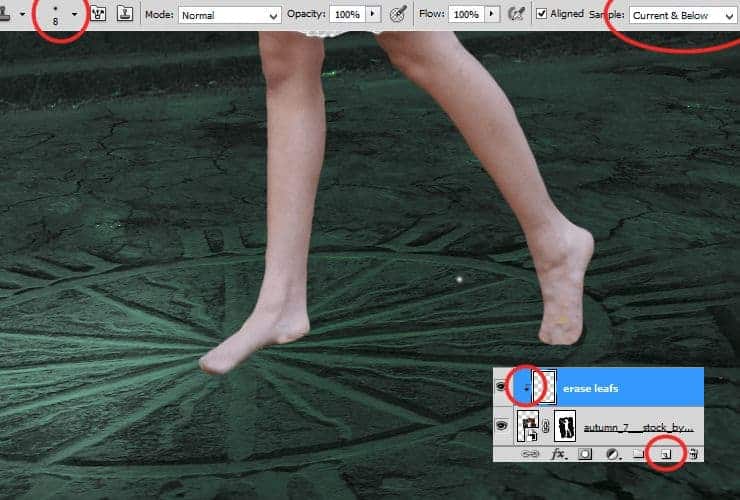
Step 15
Add new Hue/Saturation layer (Layer > New adjustment layer…). Right-click on adjustment layer and choose “Create clipping mask” (Alt+Ctrl+G or Layer > Create Clipping Mask). You’ll decrease saturation of bottom part. Let’s mask top part of the canvas, by soft round brush wih dynamic opacity.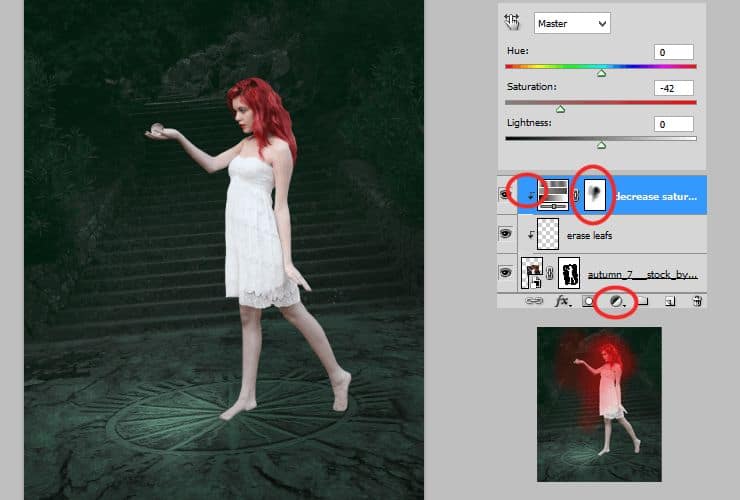
Step 16
Add new layer (Layer > New > Layer or Shift + Ctrl + N), then right-click on blank layer and choose “Create clipping mask” (Alt+Ctrl+G or Layer > Create Clipping Mask). Pick soft round, small – around 15px brush and set #515151 (dark gray) color. Draw some shadows on feets.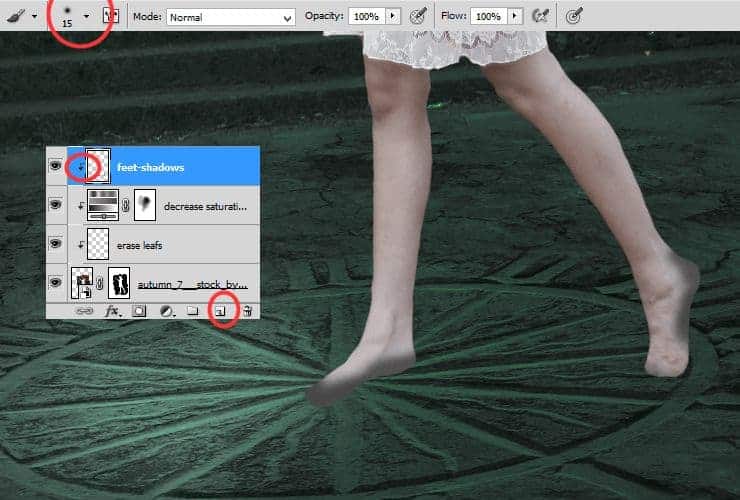
Change blending mode to Multiply, decrease opacity to 80%.
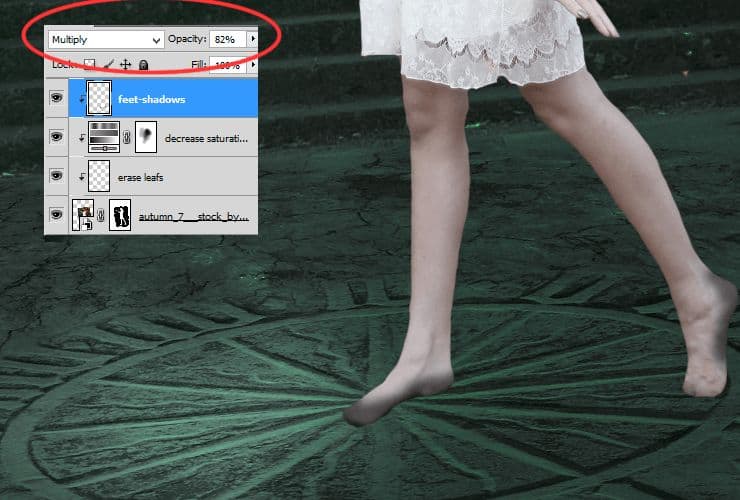
Step 17
Add new layer (Layer > New > Layer or Shift + Ctrl + N), then right-click on blank layer and choose “Create clipping mask” (Alt+Ctrl+G or Layer > Create Clipping Mask). Use clone stamp tool and click with alt to make source, then click where you want to fix model’s skin.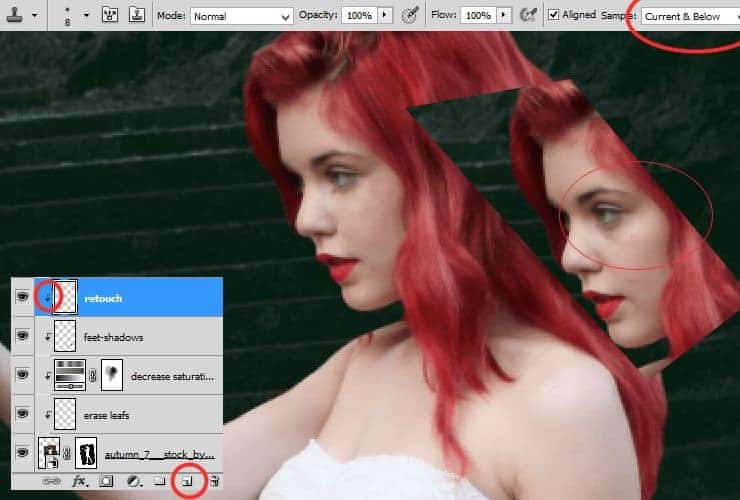
Step 18
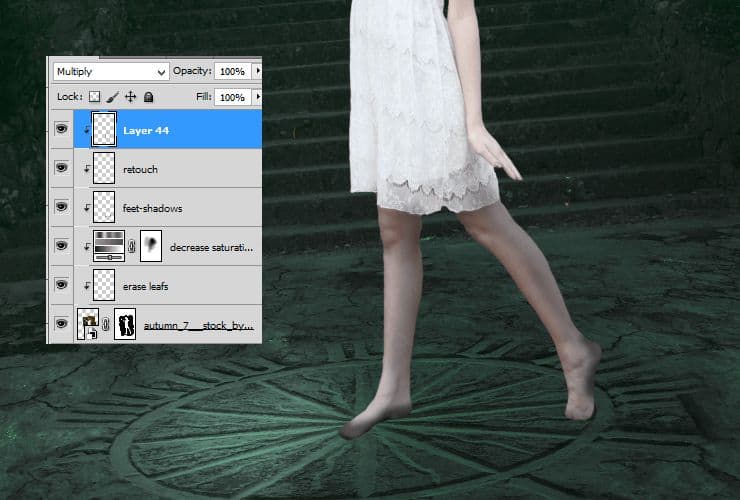
Light source (fire) will be in model’s hand and on the floor. Draw shadows on her legs. Add new layer (Layer > New > Layer or Shift + Ctrl + N), right-click on blank layer and choose “Create clipping mask” (Alt+Ctrl+G or Layer > Create Clipping Mask). Pick soft round brush and set light-gray color (here: #827c7d). Draw shadows on the back of legs.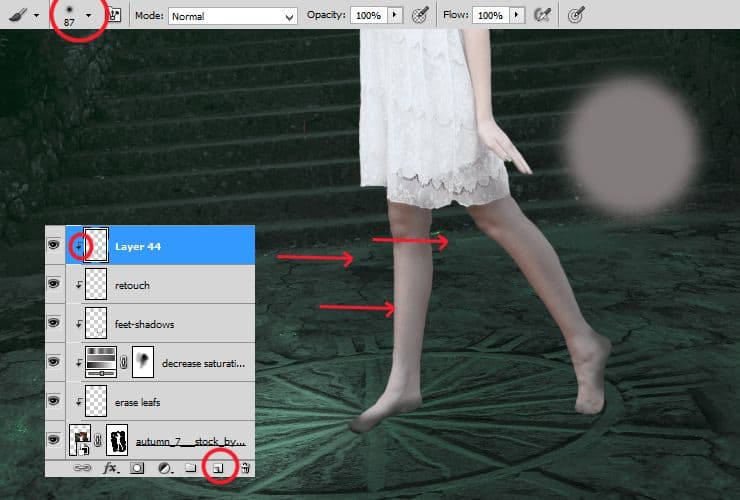
Change blending mode to Multiply.
Step 19
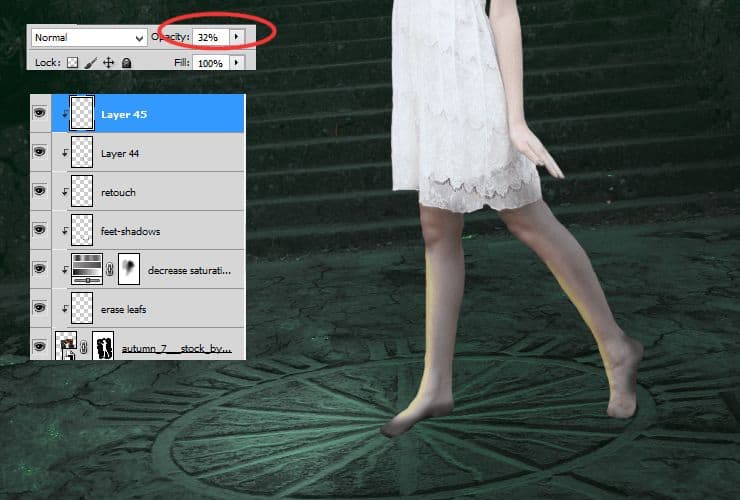
Add new layer (Layer > New > Layer or Shift + Ctrl + N), right-click on blank layer and choose “Create clipping mask” (Alt+Ctrl+G or Layer > Create Clipping Mask). Pick soft round brush and set light-yellow color (here: #827c7d). Draw lights on the front of legs.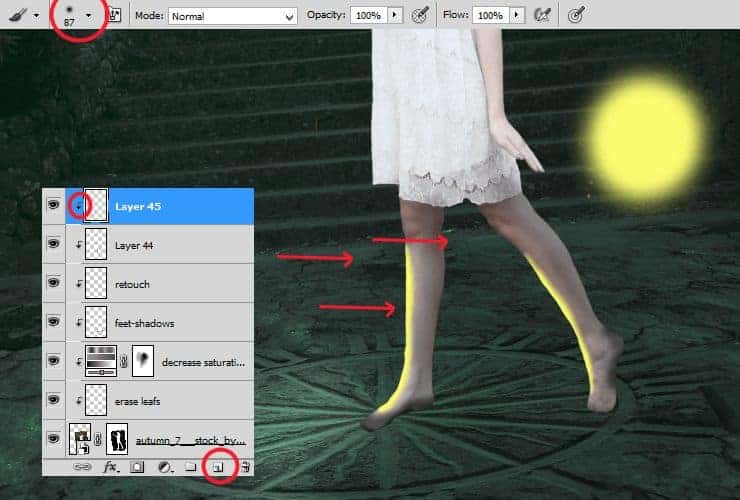
Decrease opacity to 32%.
Step 20
At night, without light everything is less contrasted. Show it on your work. Add Brightness/Contrast adjustment layer (Layer > New adjustment layer…) and set it as is shown. Right-click on layer and choose “Create clipping mask” (Alt+Ctrl+G or Layer > Create Clipping Mask).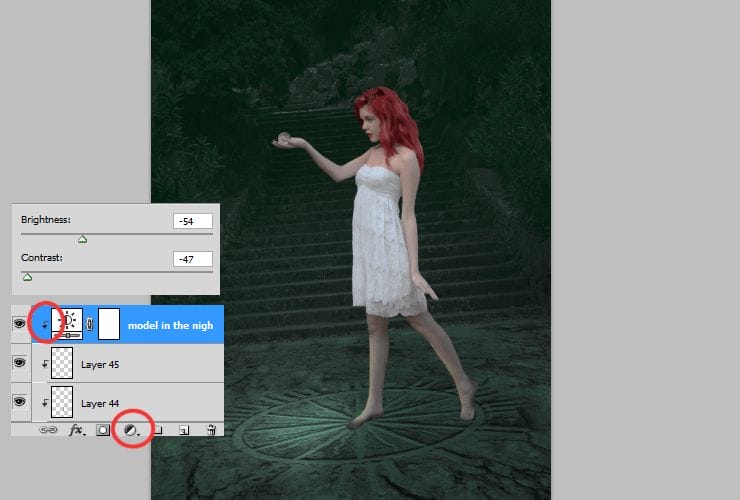
Step 21
This step will be necessary for making hand, holding fireball. Add new layer (Layer > New > Layer or Shift + Ctrl + N) and with white, small, soft brush draw some lights on her fingers. Then, decrease opacity of this layer to around 70%.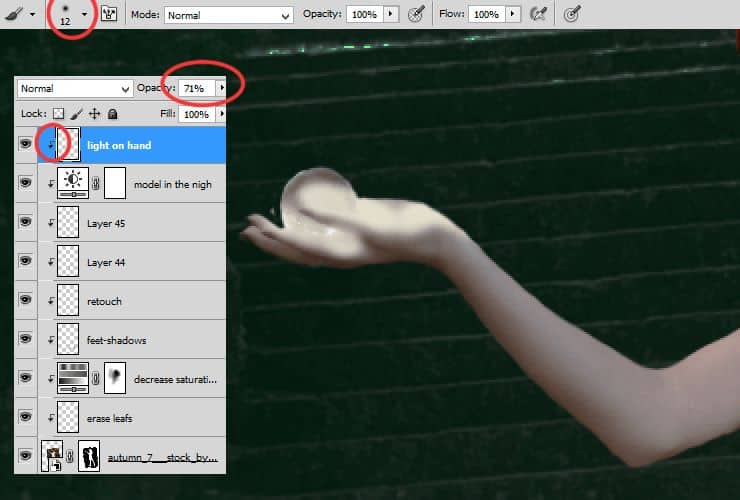
Step 22
This is another way to make lights. Create new adjustment layer with Brightness/Contrast (Layer > New adjustment layer…). Right-click on layer and choose “Create clipping mask” (Alt+Ctrl+G or Layer > Create Clipping Mask). Then, by soft brush mask (click on white canvas, next to layer thumbnail) parts, which should be darker. Remember about light source.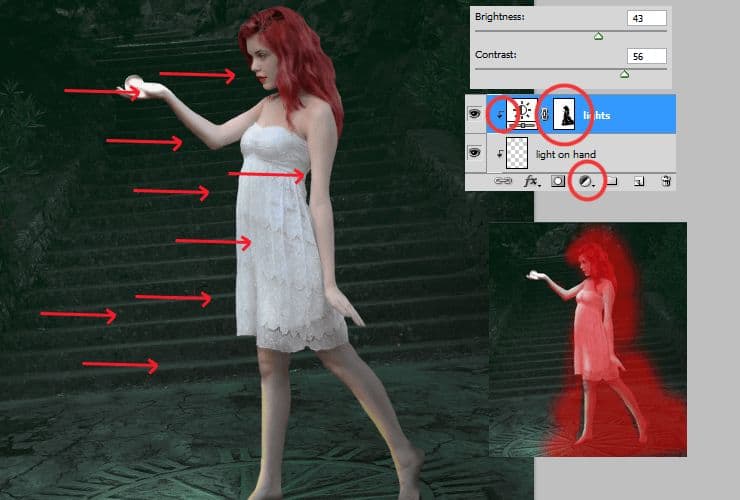
Step 23
Repeat this step, but mask lighter parts. I recommend to use bigger brush with dynamic opacity.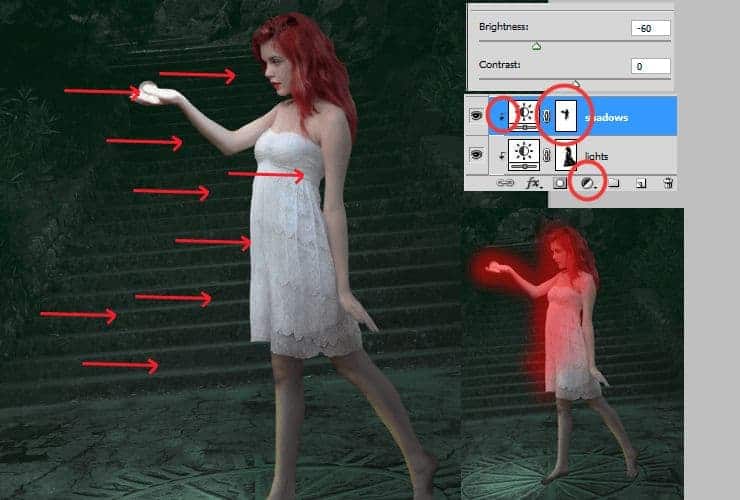
Step 24
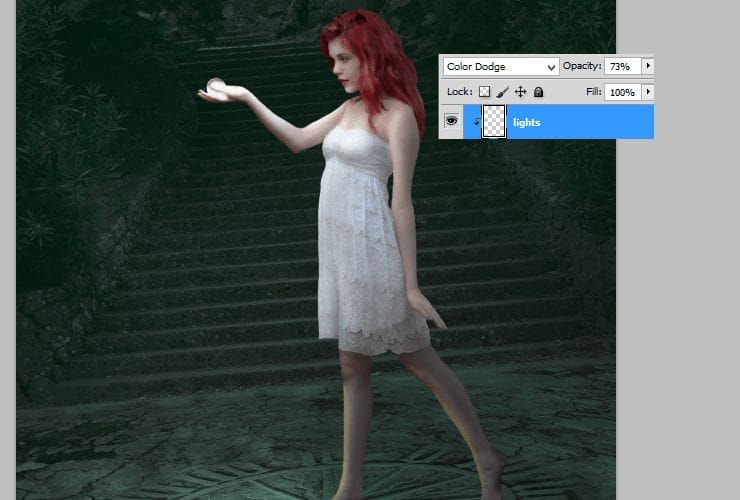
Add new layer (Layer > New > Layer or Shift + Ctrl + N), right-click on blank layer and choose “Create clipping mask” (Alt+Ctrl+G or Layer > Create Clipping Mask). Pick soft round brush and set white color. Draw some lights at arms, face, breast and hands. With this step, you can make lights more precisely than with adjustment layer.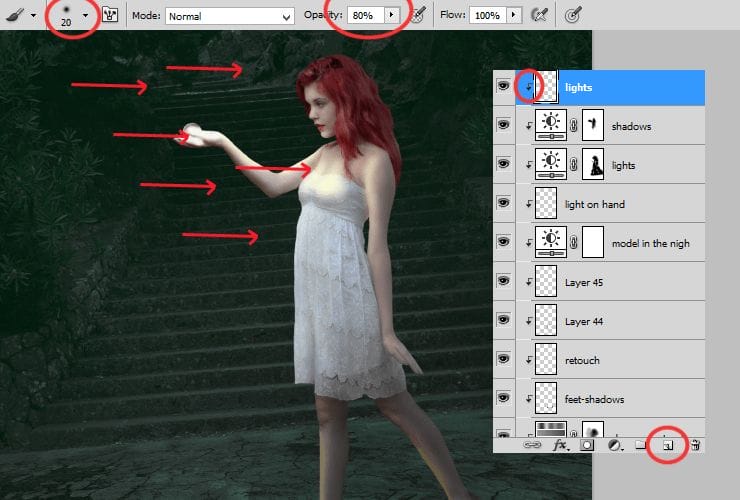
Change blending mode to Color dodge, decrease opacity to around 75% (here: 73%).
Step 25
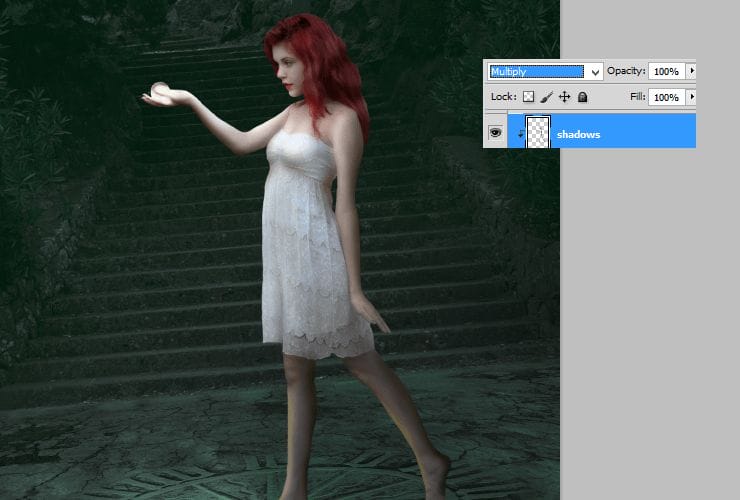
Do the same with shadows. Add new layer (Layer > New > Layer or Shift + Ctrl + N), right-click on it and choose “Create clipping mask” (Alt+Ctrl+G or Layer > Create Clipping Mask). Pick soft round brush and set smoked green (#5f5529) color. Draw shadows on her hair, hands, skirt and legs.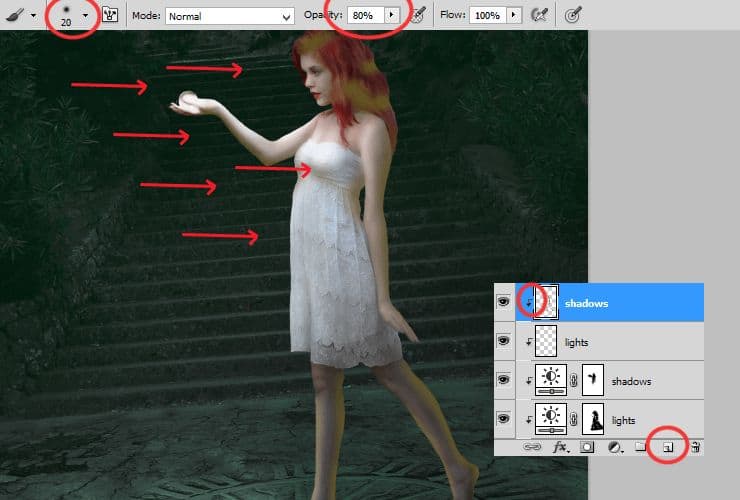
Change blending mode of this layer to Muliply.
Step 26
Heat up colors. Add new layer (Layer > New > Layer or Shift + Ctrl + N), right-click on it and choose “Create clipping mask” (Alt+Ctrl+G or Layer > Create Clipping Mask). Pick soft round big (really big) brush and set warm yellow (#e2c306) color. Draw big soft stain on hand and her face. For better effect, choose warm orange (#ff8706) color and draw some dots on the top of her hands and nose.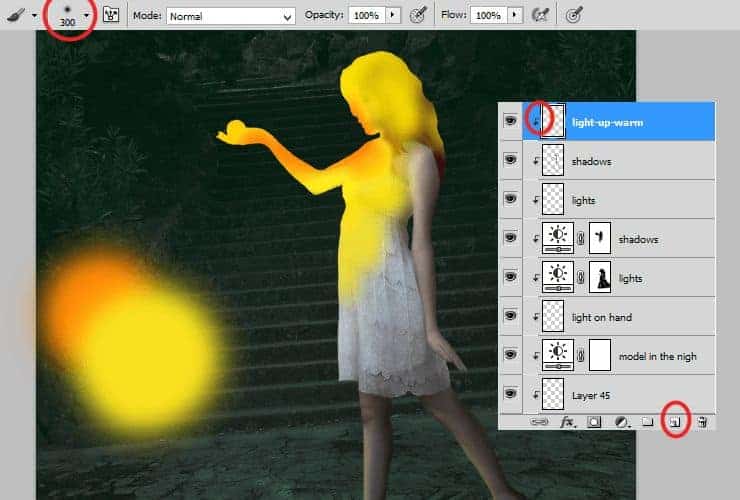
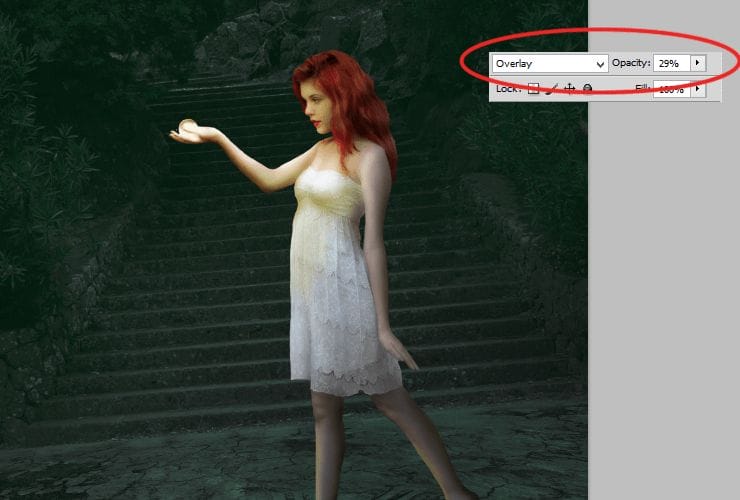
Change layer opacity and blending mode to Overlay 29%.
Step 27
Go back below layer with stock model. Duplicate stock model (Drag and drop to new layer symbol or go to Layer > Duplicate Layer). Transform this layer (Ctrl + T). Change point of transformation by holding ctrl, so you can change perspective of layer.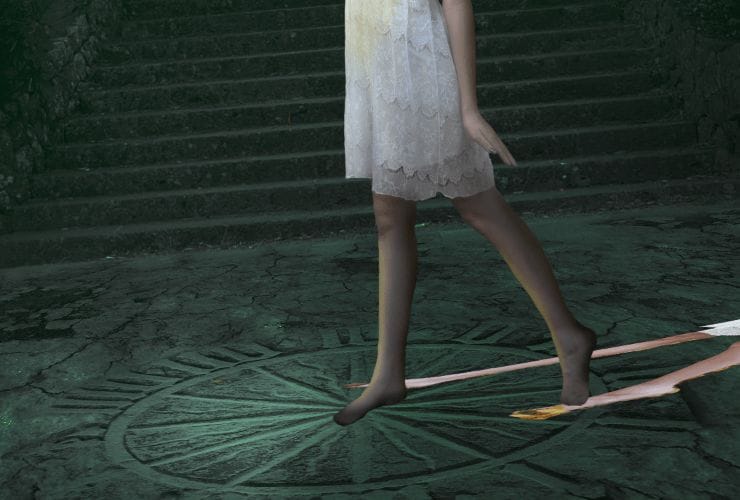
Step 28
Add new adjustment layer with Hue/Saturation (Layer > New adjustment layer…). Right-click on it and choose “Create clipping mask” (Alt+Ctrl+G or Layer > Create Clipping Mask). Set it as is shown.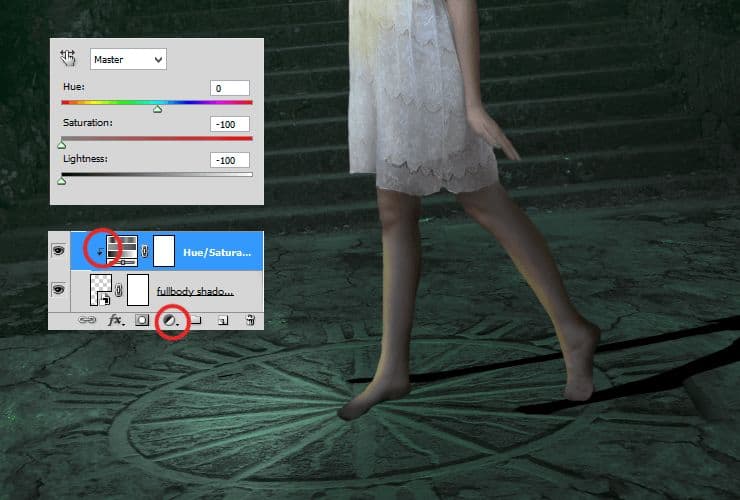
Step 29
Click on blank canvas next to layer thumbnail. Set big soft brush and erase feets and knees from this layer.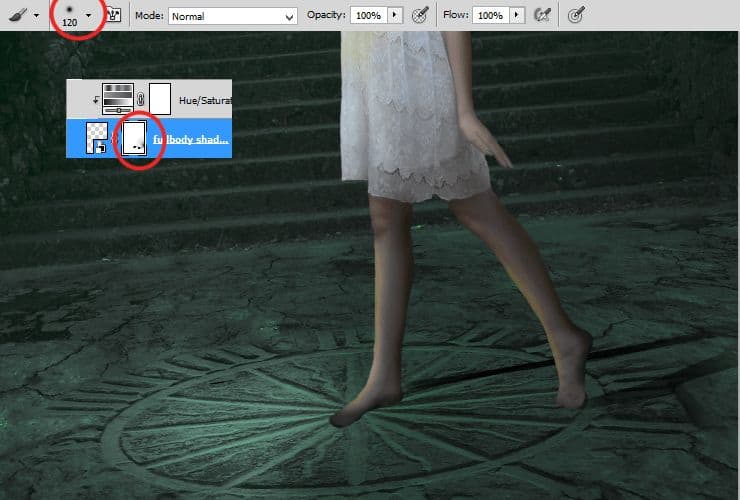
Step 30
Then, go to Filter > Blur > Gaussian blur. Set it as is shown.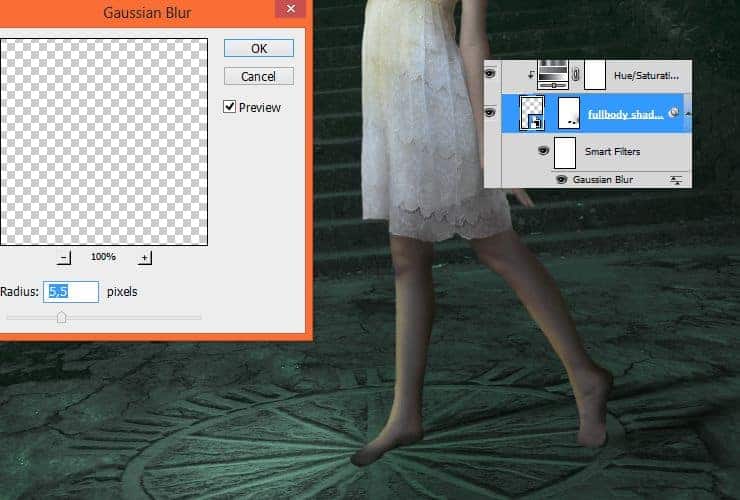
Step 31
Add new layer (Layer > New > Layer or Shift + Ctrl + N). Choose soft round brush, around 30px size. Draw something like rectangle with dots on corners.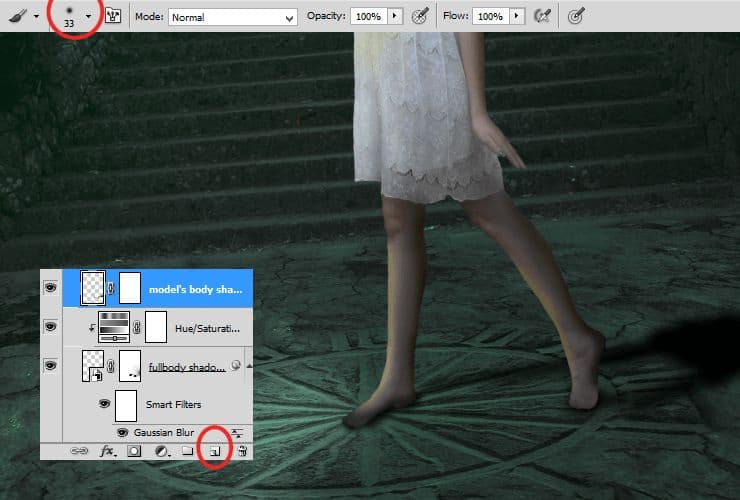
Step 32
Add layer mask – click on marked shortcut. Then, choose huge soft round brush and erase right side of layer. For smoother effect, you can decrease opacity of this layer to 48%.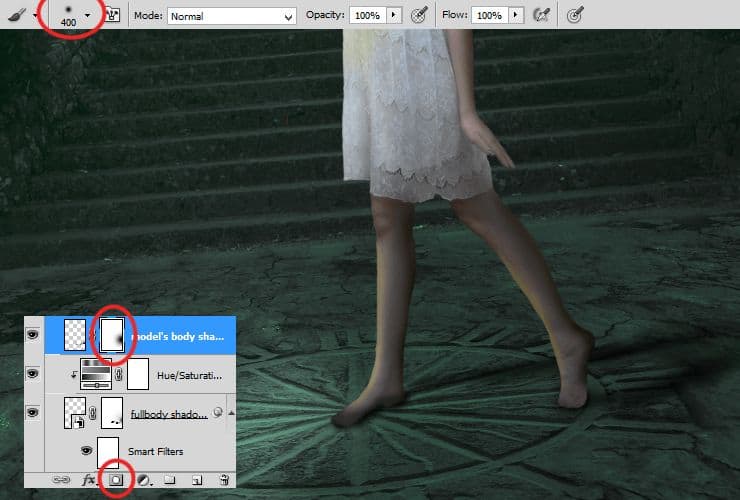
Step 33
Add new layer (Layer > New > Layer or Shift + Ctrl + N). Use black soft, round brush with smaller opacity and draw blured shadow.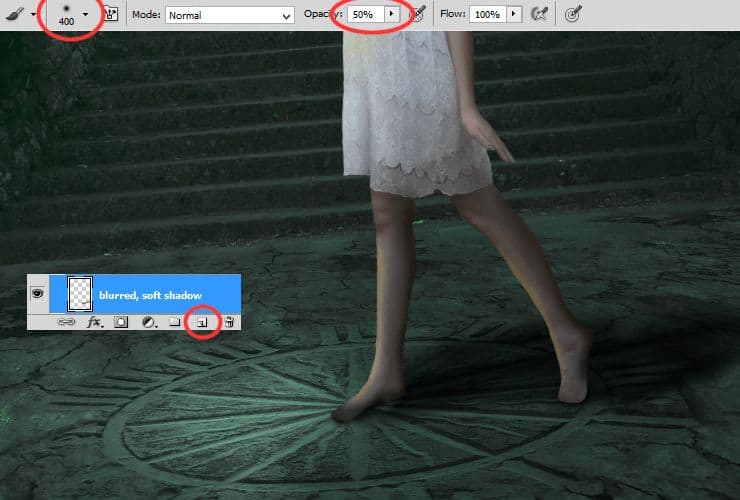
Decrease opacity to around 60%.

Step 34
Add new layer (Layer > New > Layer or Shift + Ctrl + N). Pick soft round brush with opacity around 30%. Set its size to 20px. Draw shadows below feet.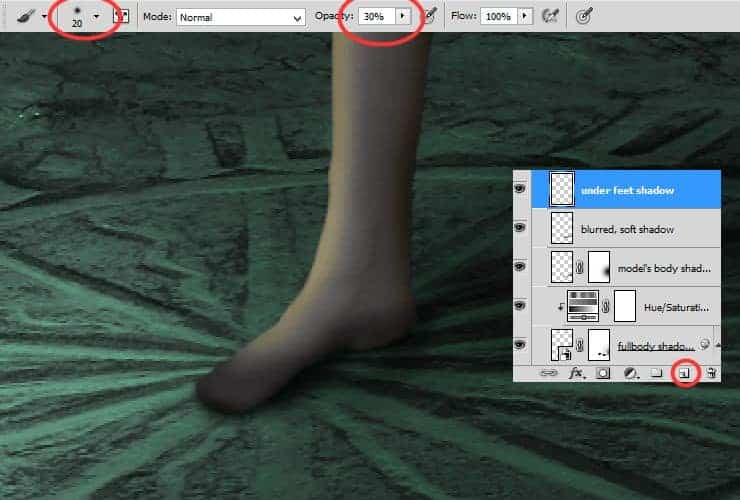
Step 35
Again add new layer (Layer > New > Layer or Shift + Ctrl + N). Pick soft round brush with opacity around 30%. Set its size to 120px. Draw shadows below second feet.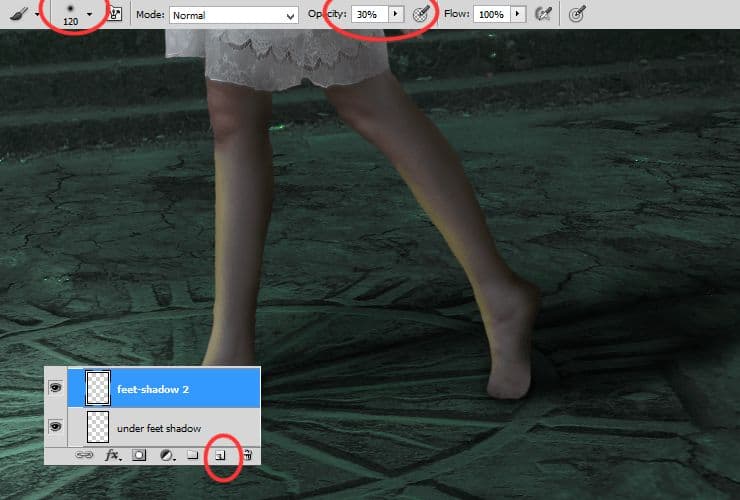
Step 36
This step is optional. Go above all layers. Add new layer (Layer > New > Layer or Shift + Ctrl + N). Make base for shoes. I used hard round brush, #0d050e color (dark purple), with dynamic size.
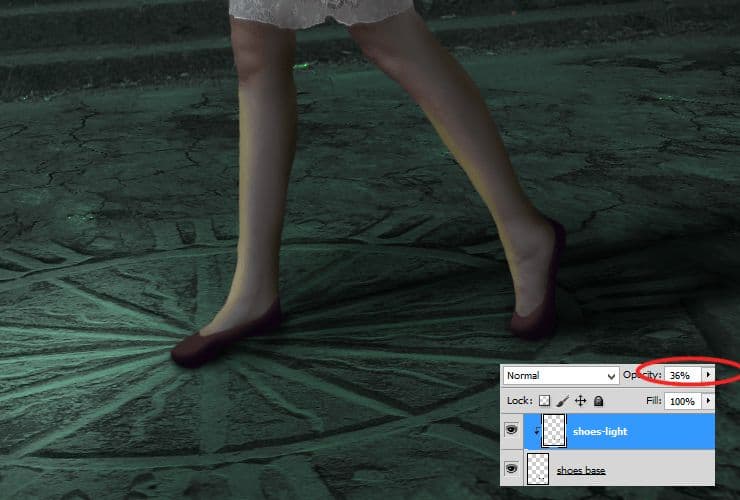
Add new layer (Layer > New > Layer or Shift + Ctrl + N). Then, right-click on it and choose “Create clipping mask” (Alt+Ctrl+G or Layer > Create Clipping Mask). Choose soft round brush around 15 px. Use #7a5d54 color. Draw lights from fire, which you’ll place.
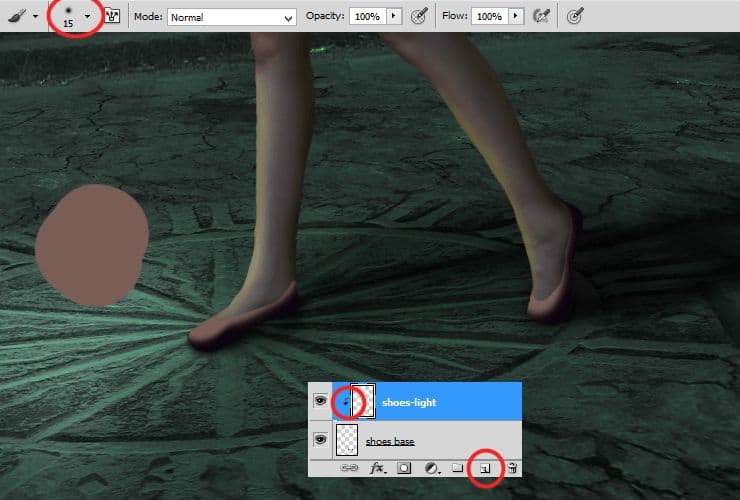
Decrease its opacity to 36%.
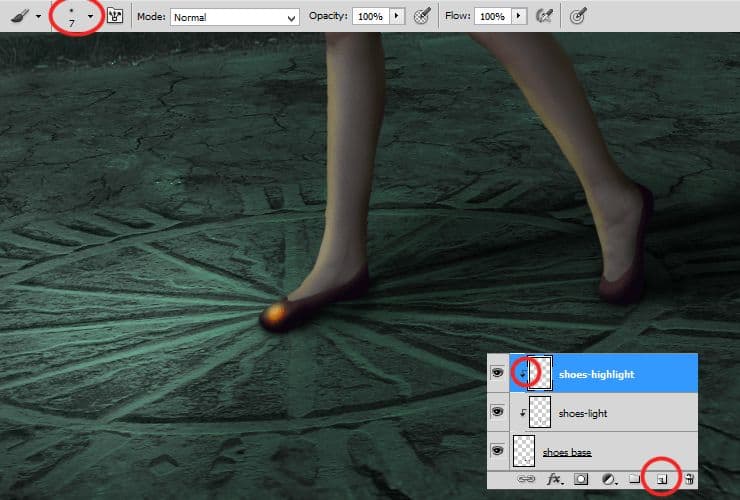
Add new layer (Layer > New > Layer or Shift + Ctrl + N). Then, right-click on it and choose “Create clipping mask” (Alt+Ctrl+G or Layer > Create Clipping Mask). Choose soft round brush around 6 px. Use #fe8e23 and #fbd888 color. Draw highlight on shoe.
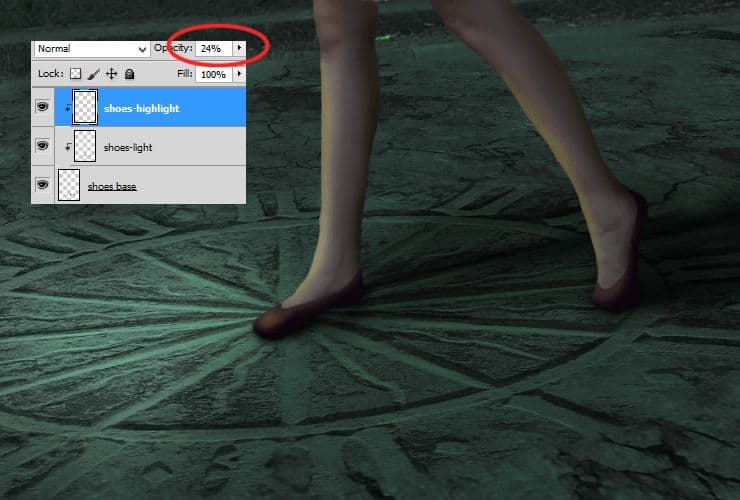
Decrease its opacity to around 25%.
Step 37
Place “Fire” stock to your file. Drag it from folder and drop to your file. Change its blending mode to Screen. Choose 50px soft round brush and erase parts, which doesn’t fit.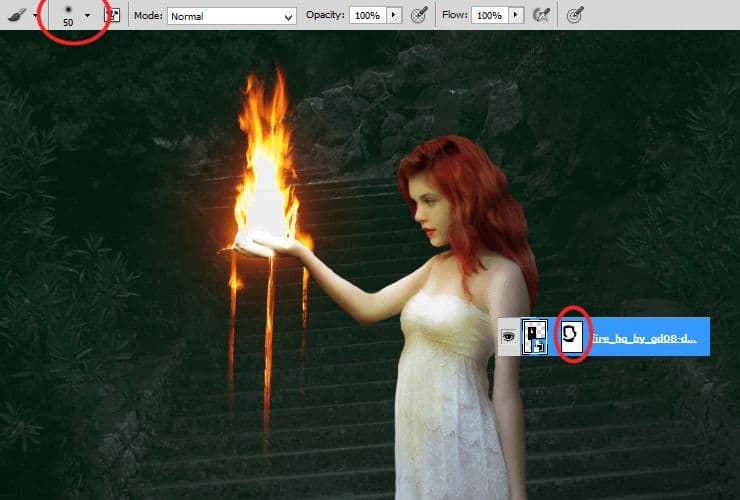
Step 38
Change blending mode of layer with fire to “Normal”, add new layer. Then, right-click on it and choose “Create clipping mask” (Alt+Ctrl+G or Layer > Create Clipping Mask). Use Clone stamp tool and fix some fire.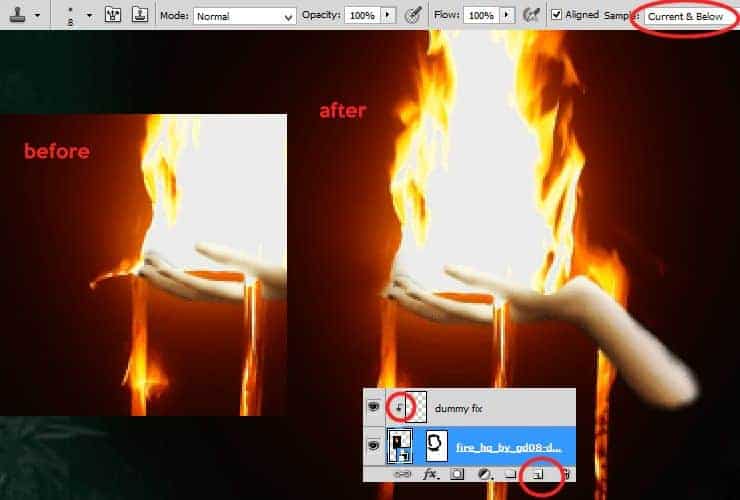
Now, change blending mode of layer with fire to “Screen” again.
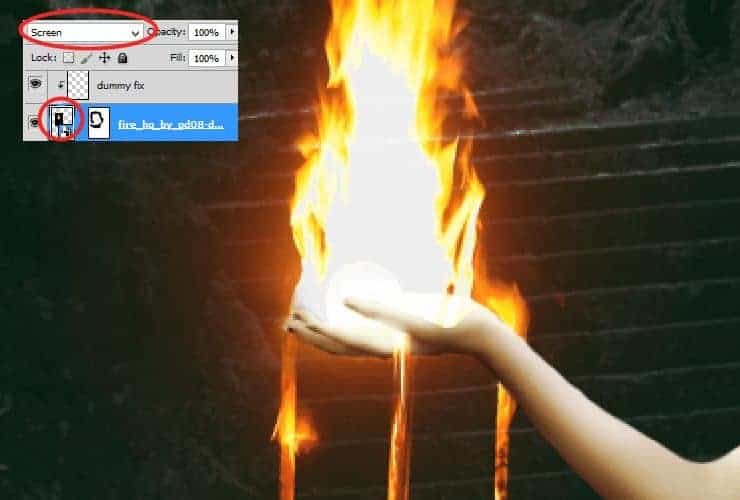
Step 39
Add new layer (Layer > New > Layer or Shift + Ctrl + N). Then, right-click on it and choose “Create clipping mask” (Alt+Ctrl+G or Layer > Create Clipping Mask). Choose soft round brush 6 px. Use #fe8e23 and #fbd888 color. Draw something drop-like on falling fire.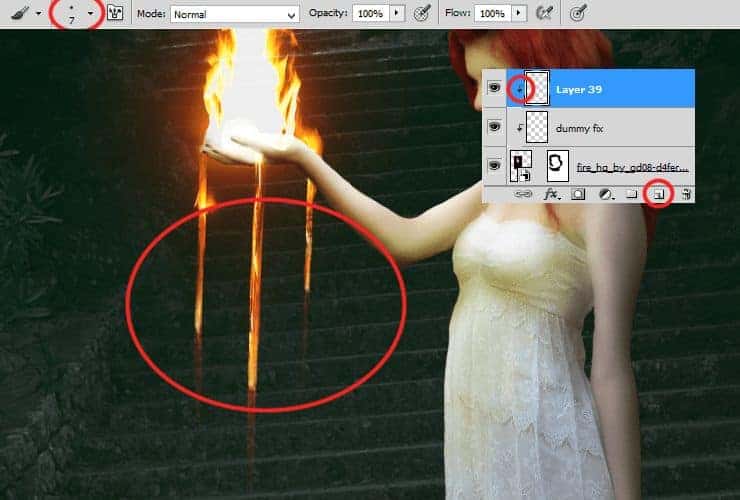
Step 40
Add new layer (Layer > New > Layer or Shift + Ctrl + N). Then, right-click on it and choose “Create clipping mask” (Alt+Ctrl+G or Layer > Create Clipping Mask). Choose soft round brush 6 px. Use white color. Draw liquid like thing on hand.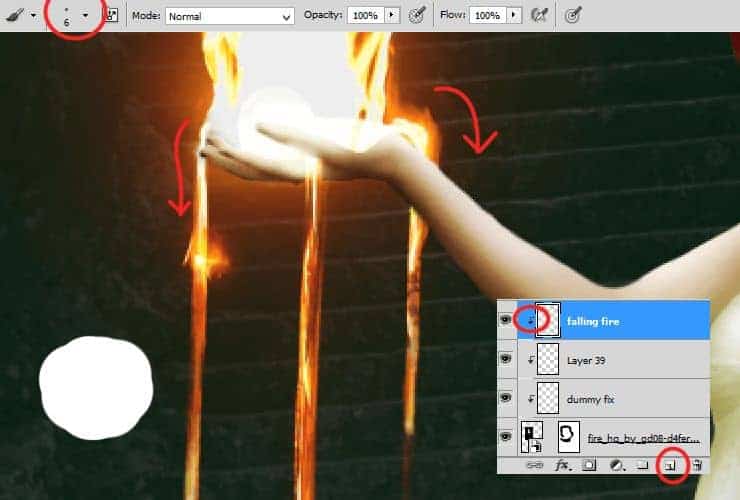
Step 41
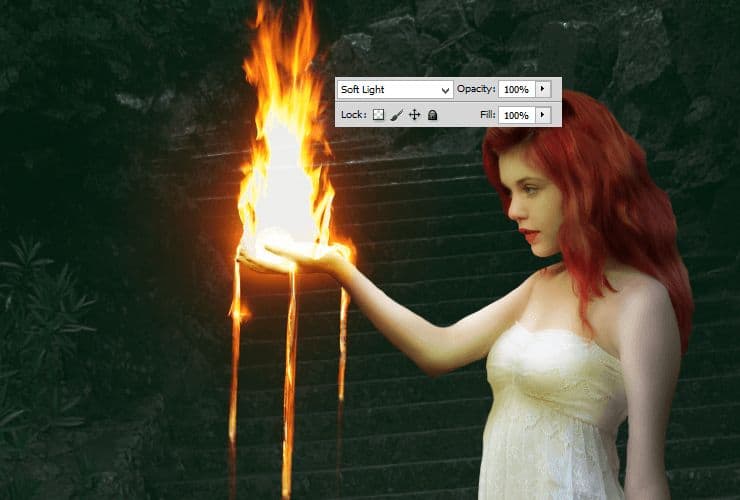
Now you’ll make fire glow. Add new layer (Shift+Ctrl+N or shortcut). Pick soft round brush around 30px size. Use #ff970f color. Draw glow around model’s hand.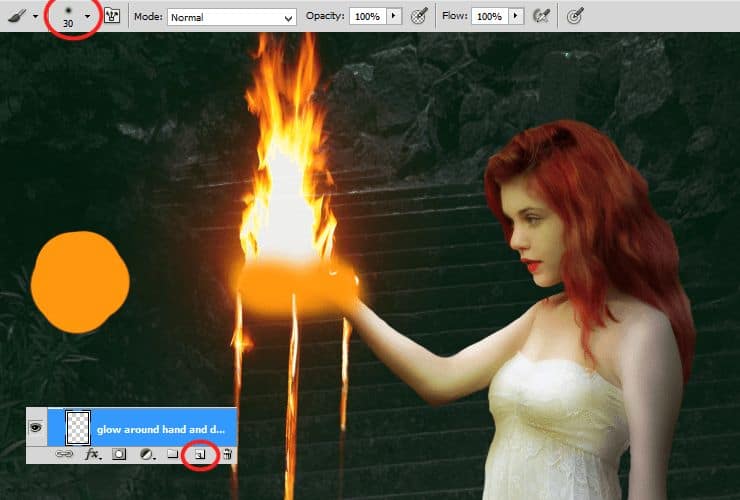
Change blending mode to Soft light.
Step 42
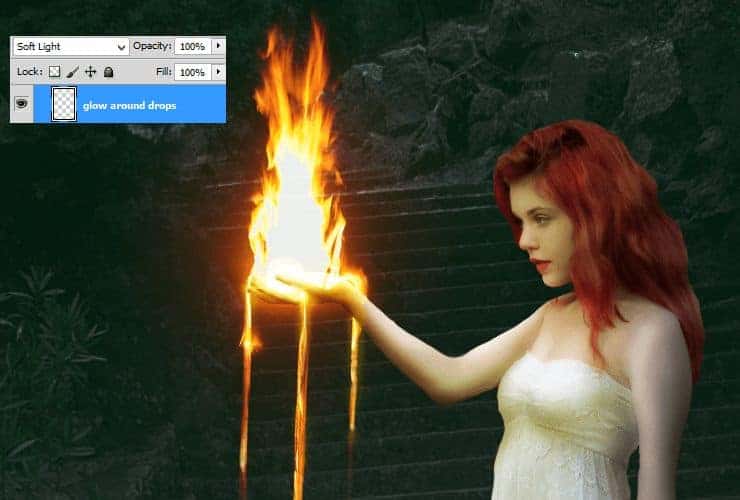
It’s time to make glow around fire drops. Add new layer (Shift+Ctrl+N or shortcut). Pick soft round brush aroun 15px. Use lighter color – #ffd514.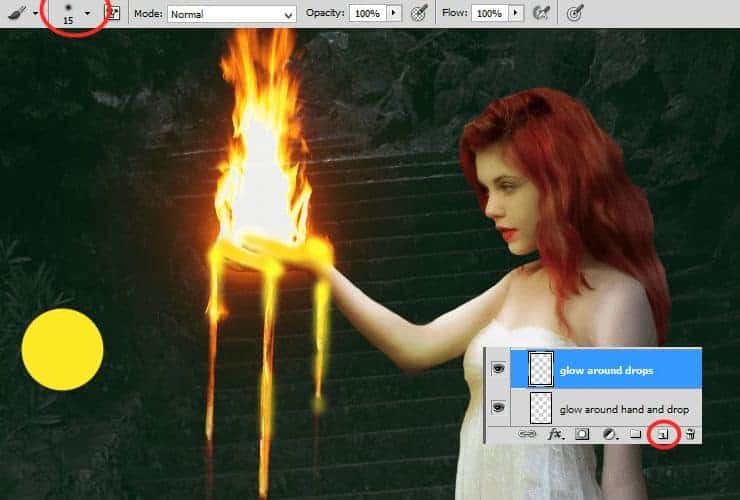
Change its blending mode to Soft light also.
Step 43
Now let’s add some light and glow to hand. Add new layer (Shift+Ctrl+N or shortcut). Pick soft round brush around 10px. Use #ff5d24 color. For better effect, I recommend dynamic opacity of brush.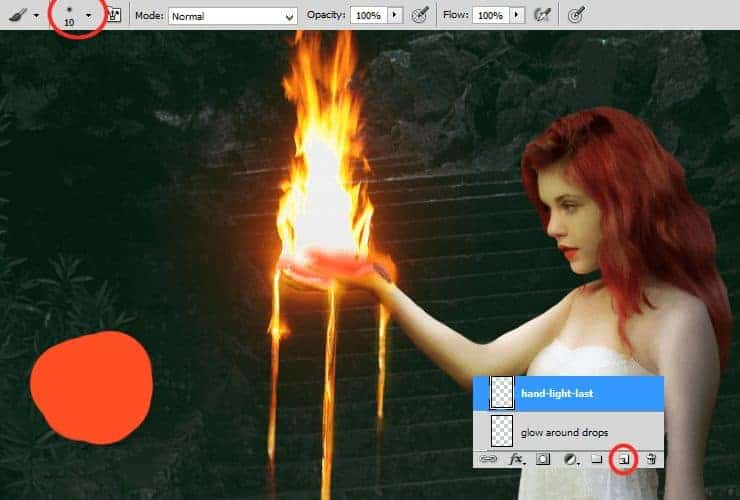
Change its blending mode to Screen.

Step 44
Now it’s the last glow – the biggest. Add new layer (Shift+Ctrl+N or shortcut). Pick soft round brush around 300px. Use light-brown color – #8e1900 and draw dot in the center of fire stock image.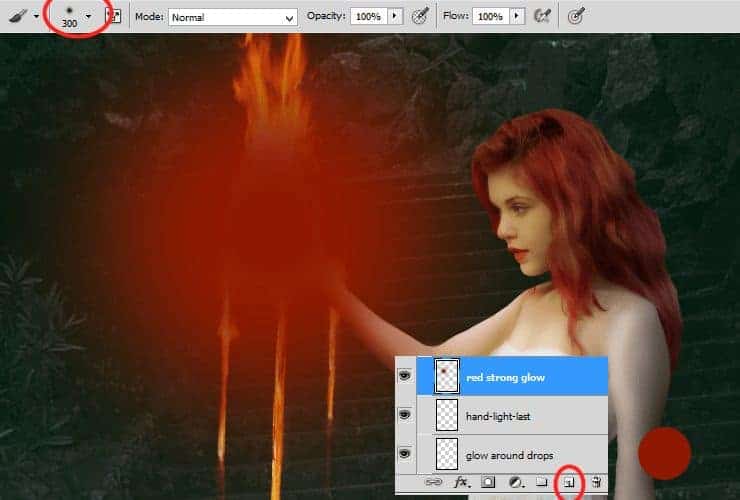
Change its blending mode and opacity to Screen, around 45%.

Step 45
Image is too bright. Let’s fix it. Add adjustment layer (Layer > New adjustment layer…) with Brightness/Contrast.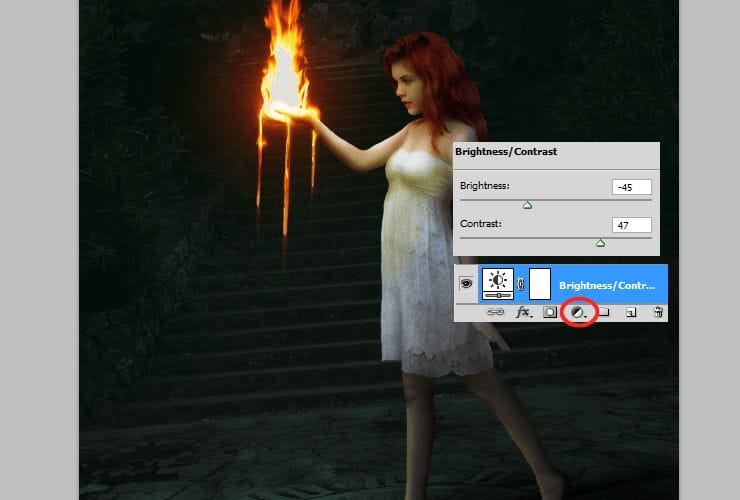
Step 46
Then, you should change colors (If you want). Add Color/Balance adjustment layer. (Layer > New adjustment layer…)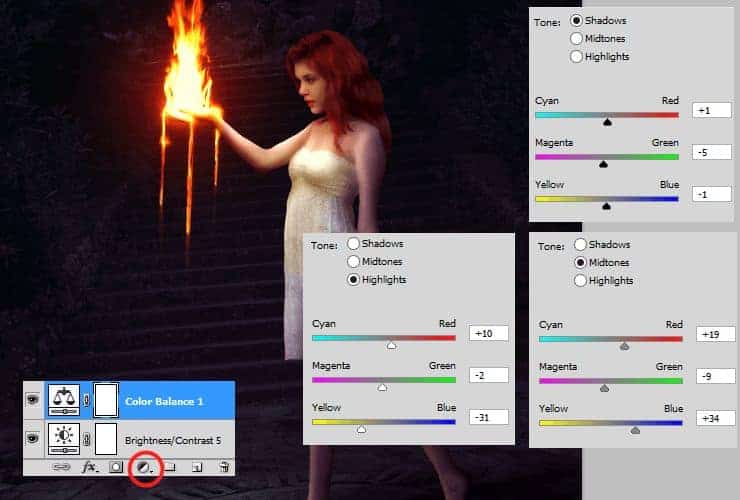
Step 47
Now you’ll make preparing for making lava on ground. Add new layer (Shift+Ctrl+N or shortcut). At first, use soft round, 400px brush and draw dot with smoked orange color (#ff7122).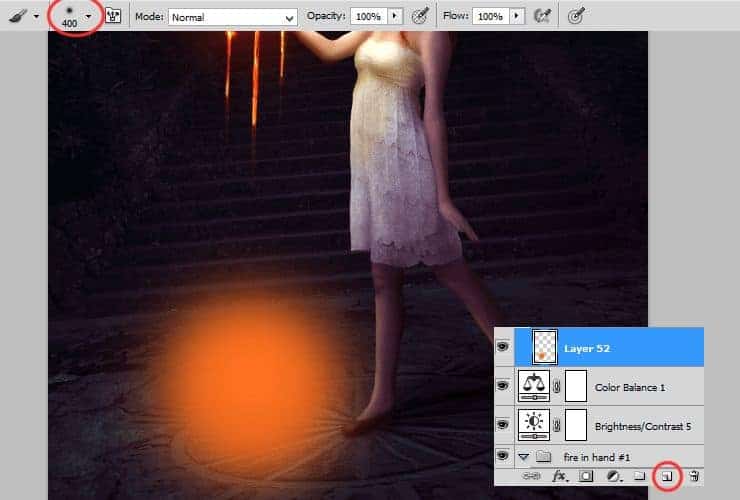
Then, draw with smaller, light-yellow (#ffe65b) brush, second dot, on first.
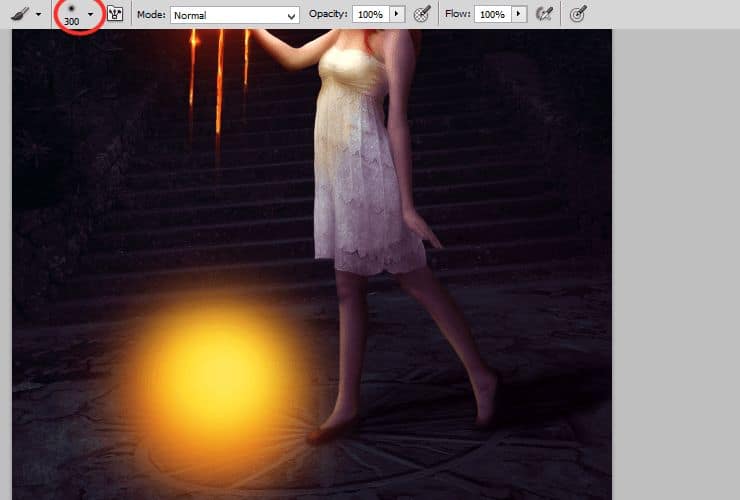
Next, transform it perspectively – ctrl + T and adjust it to ground.
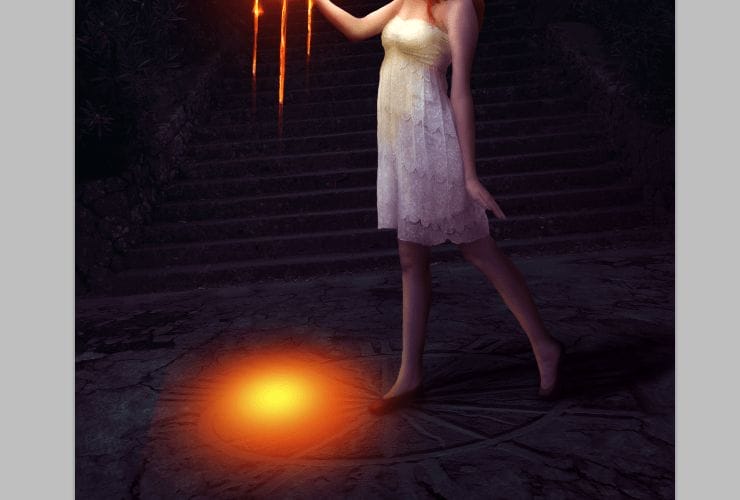
At the end, change blending mode of created layer to Hue.

Step 48
Add new layer (Shift+Ctrl+N or shortcut). At first, use soft round, 150px brush and draw splash with dark orange color (#ff3f08).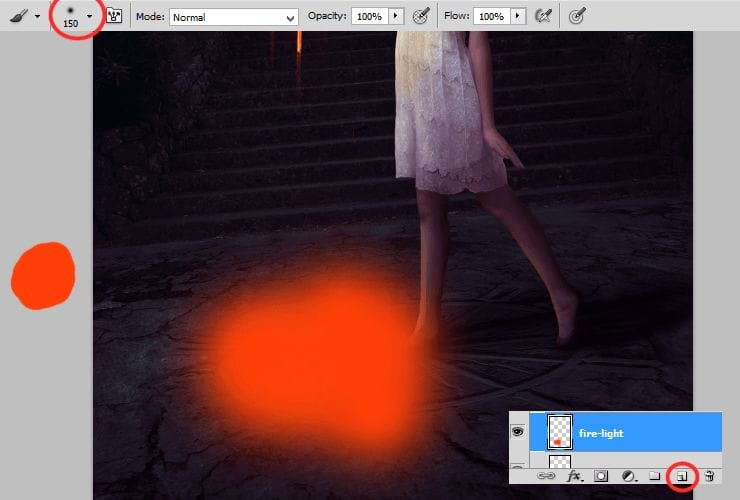
Change its blending mode to Color dodge, decrease opacity to around 10% (here:11%).
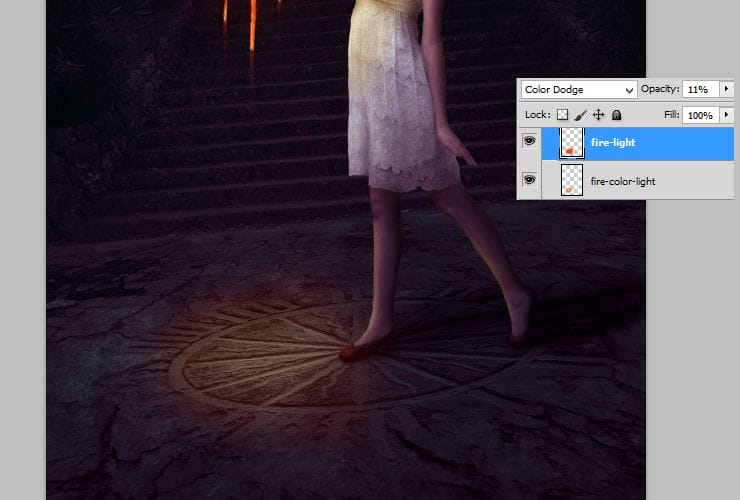
Step 49
Add more glow to your fire (yay!). Add new layer (Shift+Ctrl+N or shortcut). Use the same brush settings as before and draw glow around model’s hand, fire and drops of fire. You can decrease opacity of brush to even 50%, it depends of your desired effect.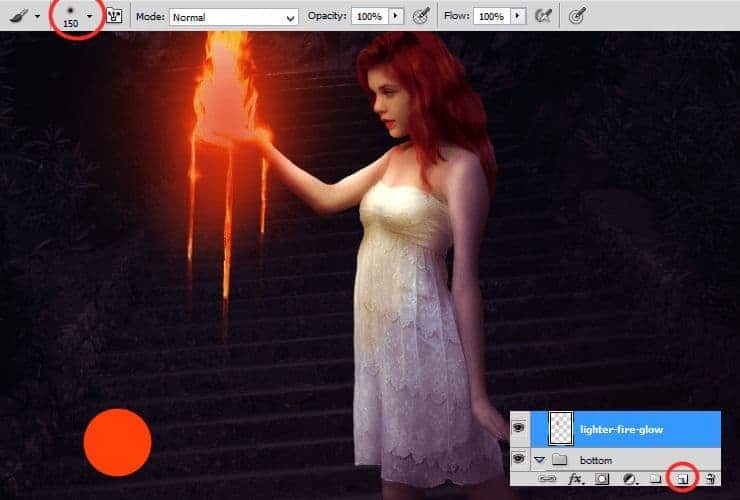
Change blending mode of this to Screen, decrease opacity to 50%.
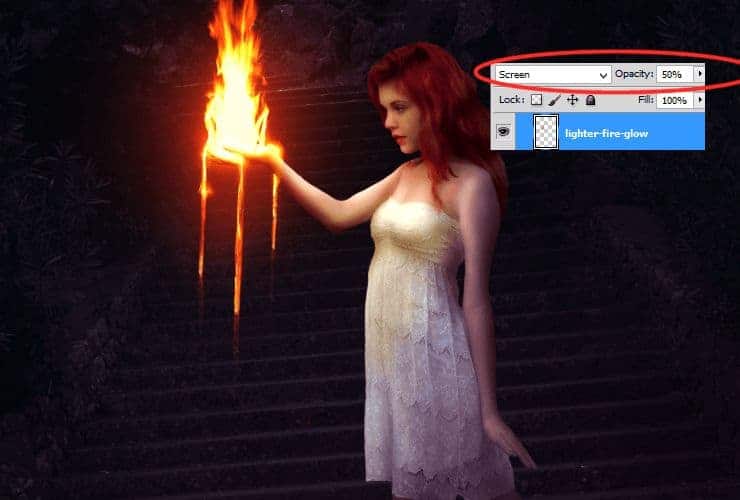
Step 50
Next glow. Next layer (Shift+Ctrl+N or shortcut). The same color. Even bigger brush size (soft, 500px, opacity around 50%).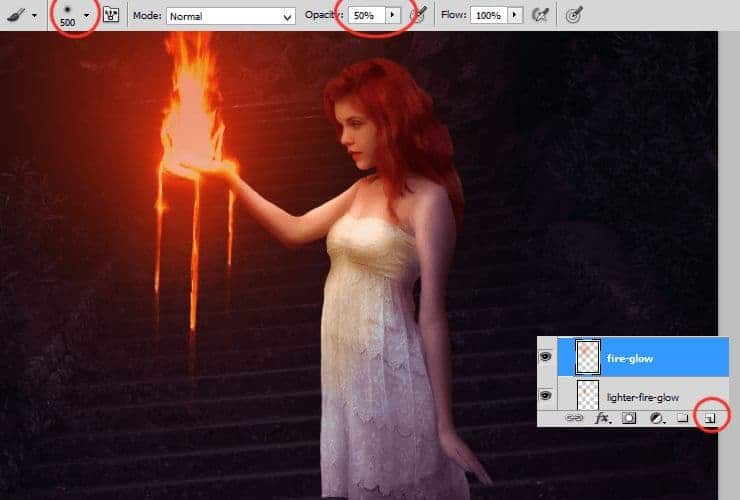
Decrease opacity – 44%, change blending mode – Soft light.
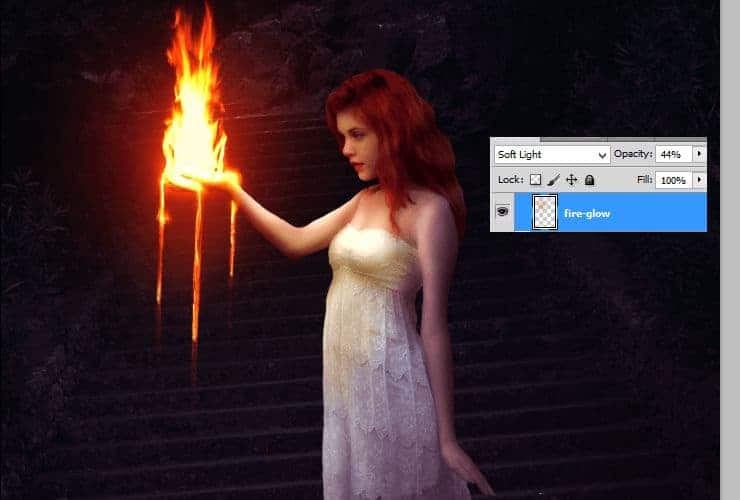
Step 51
Something more interesting than before – you’ll create particles from fire. Add New layer (Shift+Ctrl+N or shortcut). Use small hard round brush (ex. 5px) with white color. For better effect, use brush with dynamic size. Make brush strokes, like falling particles.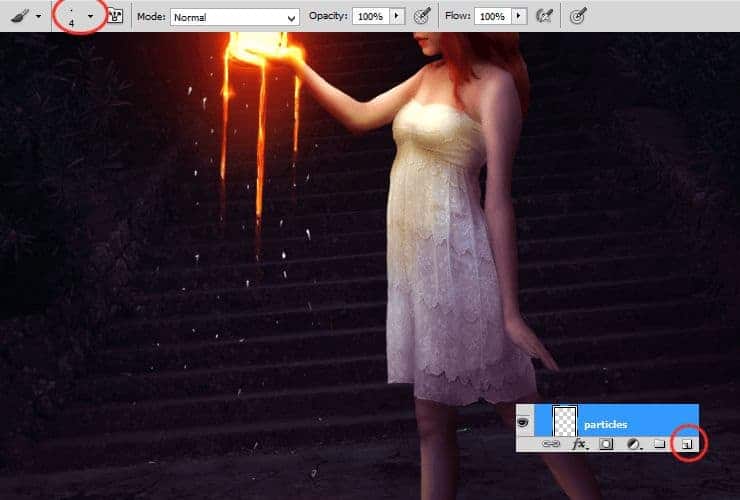
Right-click on it and choose “Blending options”. Check Outer glow and Inner Glow.
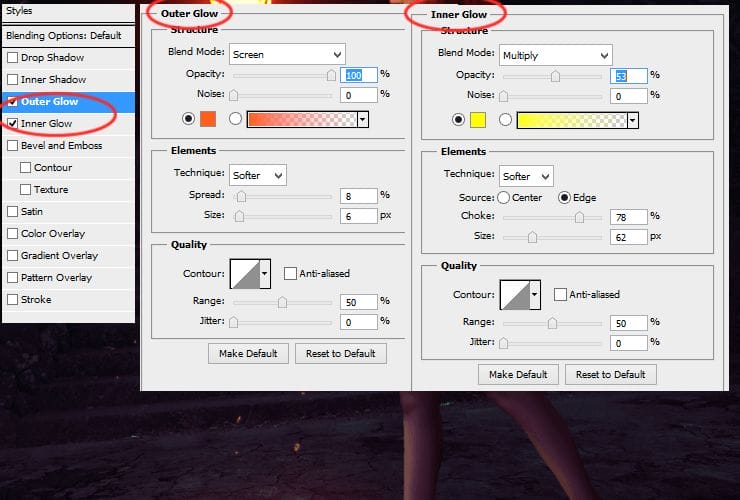
Step 52
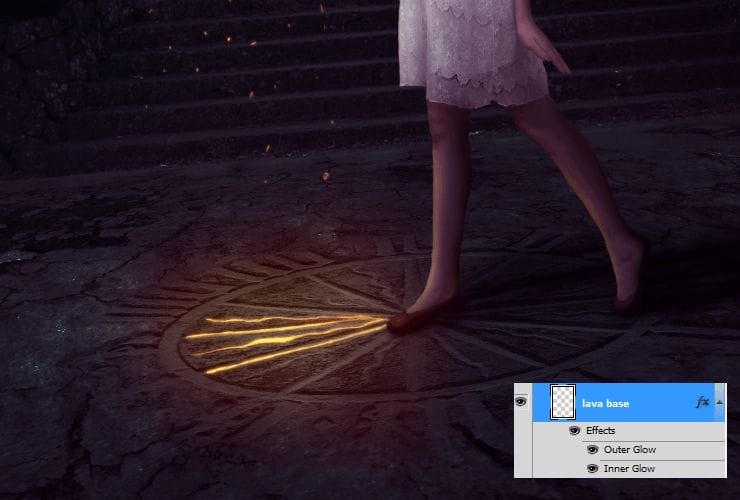
Now it’s time to make lava on bottom. It’s very similar to making particles. Add New layer (Shift+Ctrl+N or shortcut). Use the same brush settings as before. Draw base of lava by long strokes.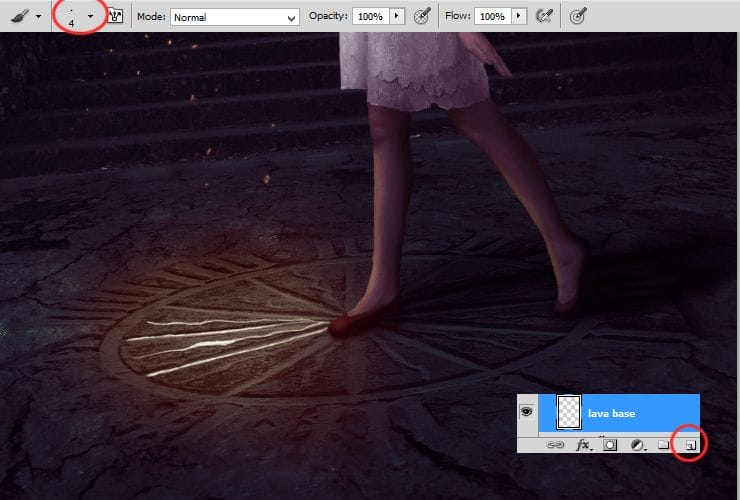
Then, just go to previous layer – with particles. Right-click on it and choose “Copy layer style”. Then go to last layer, right-click on it and choose “Paste layer style”.
Step 53
Add new layer (Shift+Ctrl+N or shortcut). Use 1px soft round brush with dynamic opacity, set #fffa70 color and draw highlight on the edges of clock from fire.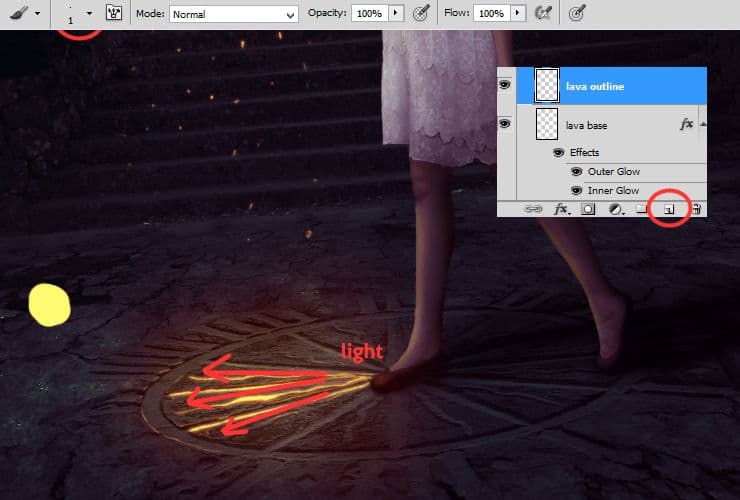
Step 54
Now you’ll set colors around lava. Add new layer (Shift+Ctrl+N or shortcut). Choose soft round brush, set #fdbe2f color and work with dynamic opacity. At first set opacity of brush to 50%. Draw something like piece of pizza (everybody loves pizza). Then, set opacity of brush to 100% and draw on arc of clock.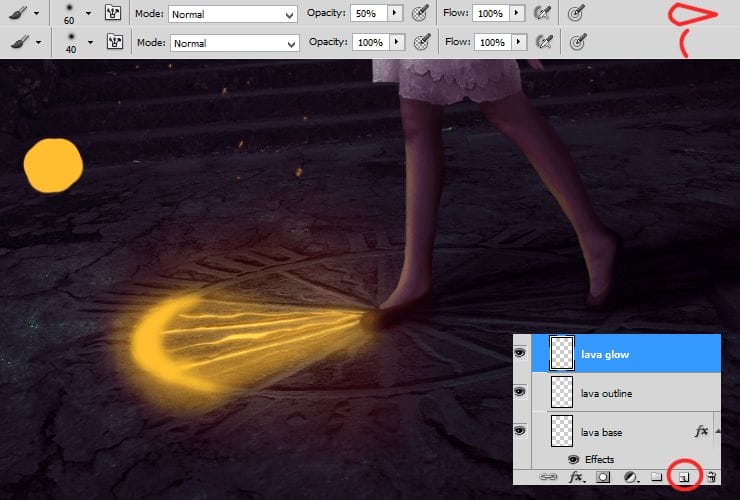
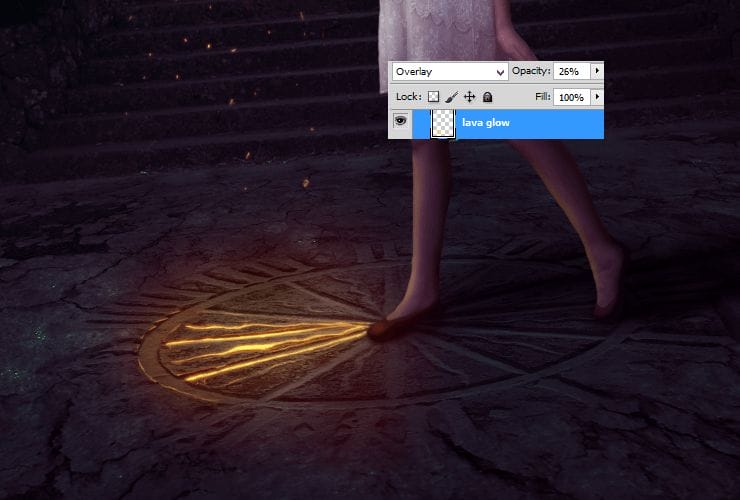
Change blending mode and opacity – Overlay, 26%.
Step 55
For better effect, you can duplicate layer (drag and drop on “New layer” symbol or go to Layer > Duplicate layer…) with highlights of clock (see step 53) and blur it (Filter > Blur > Gaussian blur) (blur around 0,2px). Then, change blending mode of this layer to Soft light.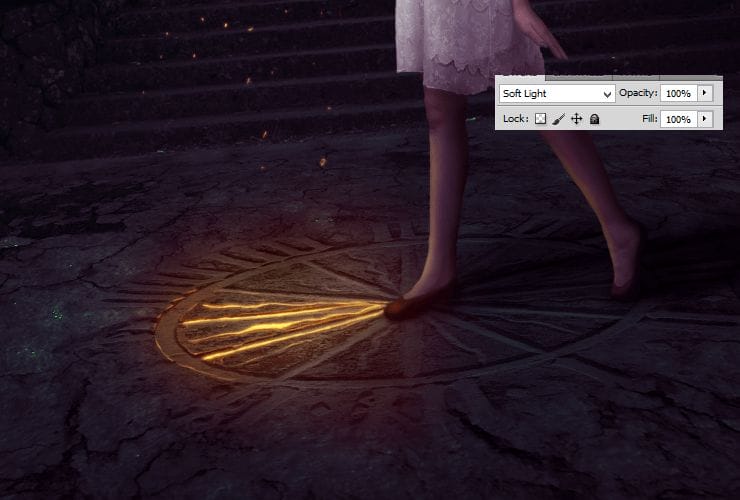
Step 56
You can add some shadows to your lava. Add new layer (Shift+Ctrl+N or shortcut). Use soft round, around 5px brush and set its opacity to 50%. Use darker color (#ff9f41) and draw shadows on lava.
Change blending mode of this layer to Overlay.
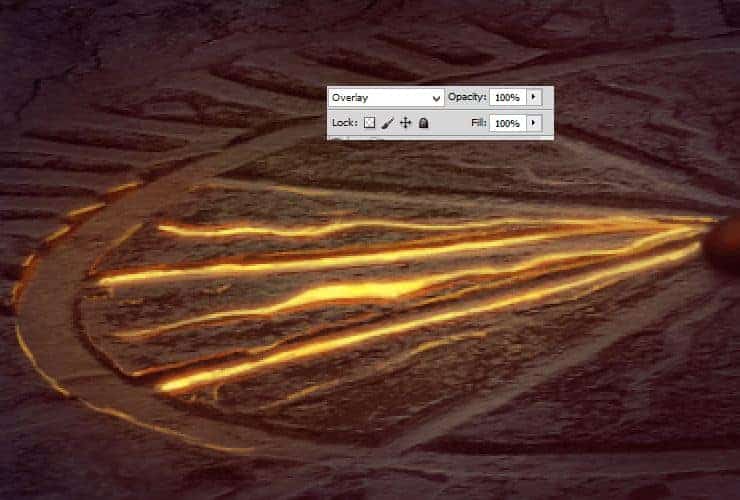
Duplicate this layer – drag and drop on “New layer” symbol or go to Layer > Duplicate layer…, then change blending mode of duplicated layer to Multiply.
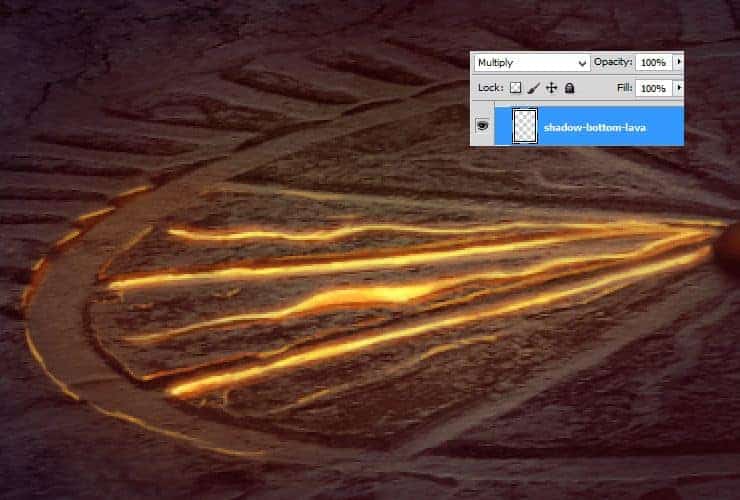
Step 57
Back to layer with particles. Duplicate it (drag and drop on “New layer” symbol or go to Layer > Duplicate layer…) and drag above all layers. Set its fill to 0%, change opacity to 61%.
Right-click on it and choose “Blending options”. Check Outer glow and uncheck Inner Glow.
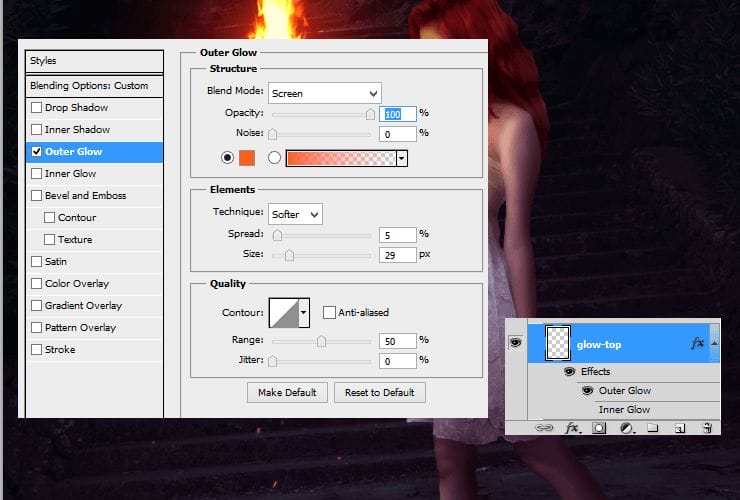
Step 58
Do the same with lava on bottom. Duplicate layer with base of lava (drag and drop on “New layer” symbol or go to Layer > Duplicate layer…). Then, just go to glow-top layer (step 57) and right-click on it. Choose “Copy layer style”. Then, just click on your duplicated lava layer with right-click and choose “Paste layer style”.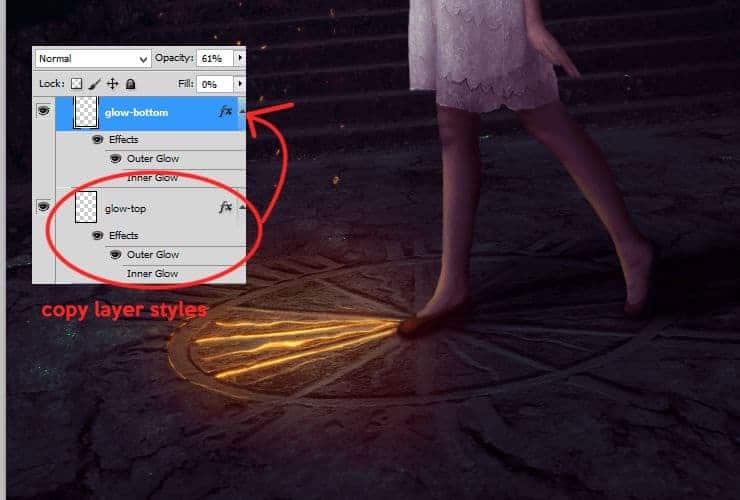
Step 59
Let’s back between fire and shoes base layers. Add new layer (Shift+Ctrl+N or shortcut). You’ll make highlight on eyes. Use 2px soft round brush and draw as is shown. I used white color for eye, light-orange and yellow for iris and white for iris highlight.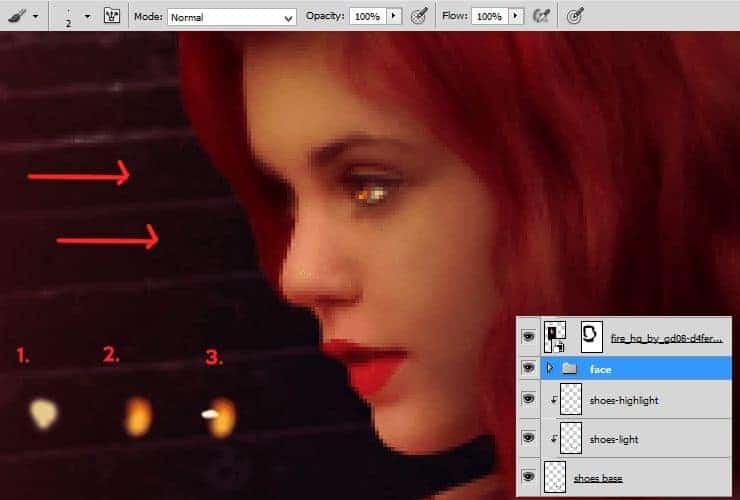
Step 60
Make contour on face and her lips. Add new layer (Shift+Ctrl+N or shortcut). Just use 1px soft round brush and change color dynamicly from white – for highlight parts, by orange – for lighter parts, and end with blue/violet to make darker parts outlines.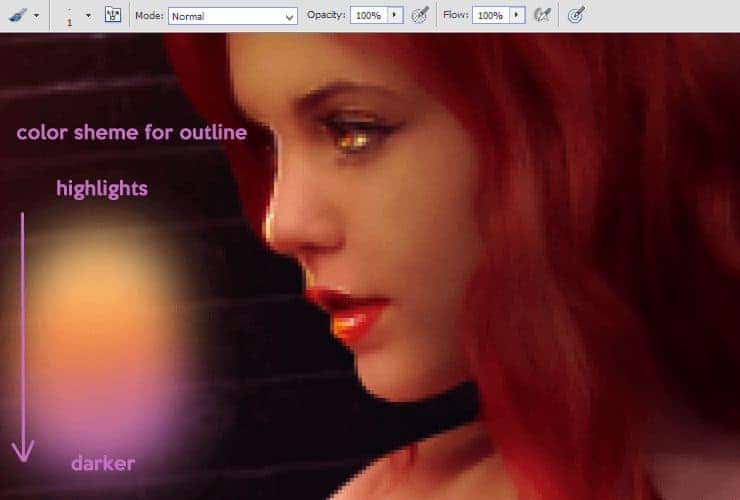
Step 61
Make shadows on face. Add new layer (Shift+Ctrl+N or shortcut). Then, use soft round brush with opacity around 60%. Use #5e1d11 color and draw shadows on nose, face edge and hair.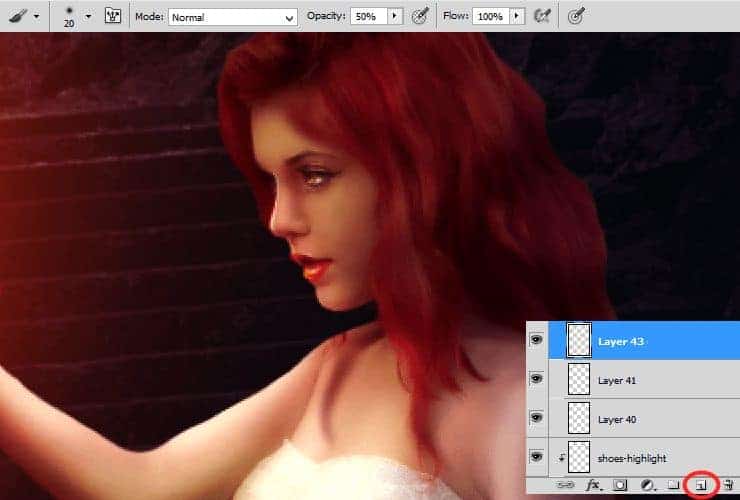
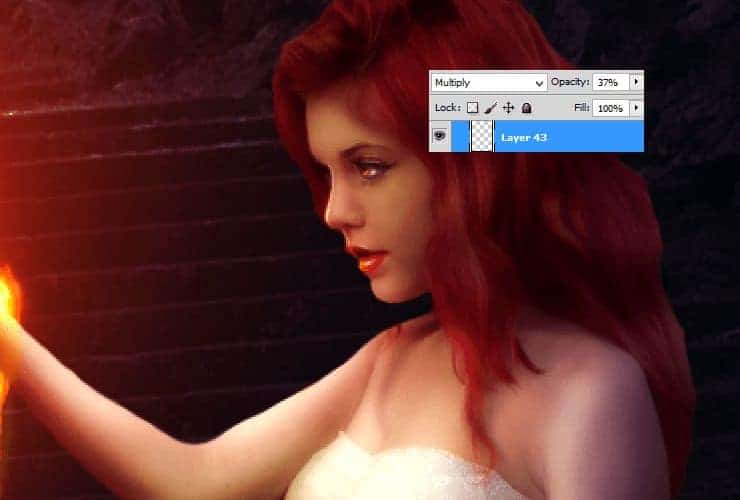
Decrease its opacity to around 40% (here:37%), change blending option to Multiply.
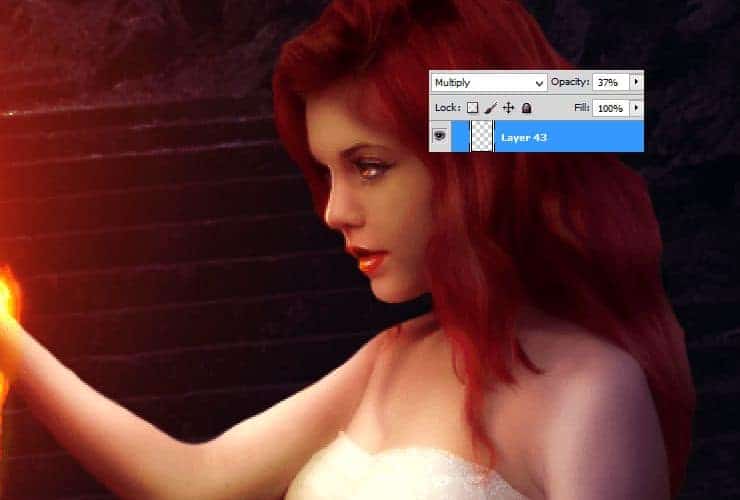
Decrease its opacity to around 40% (here:37%), change blending option to Multiply.
Step 62
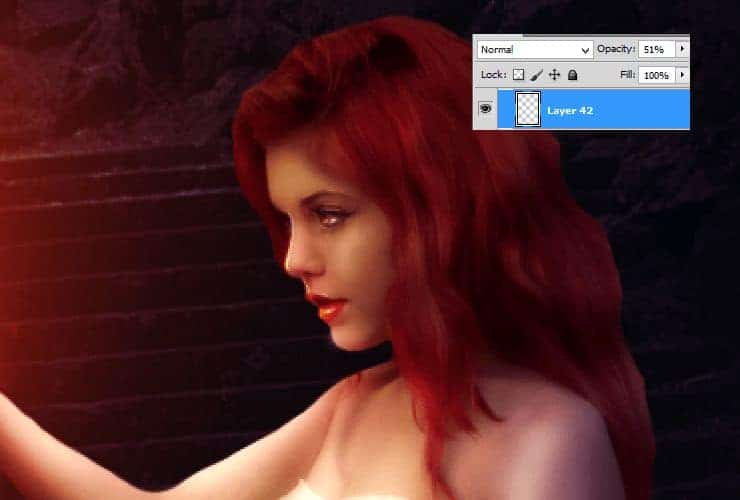
Again add new layer (Shift+Ctrl+N or shortcut). Use the same size and opacity of brush. Change color to white. Draw highlight on nose, on chin and on cheeks.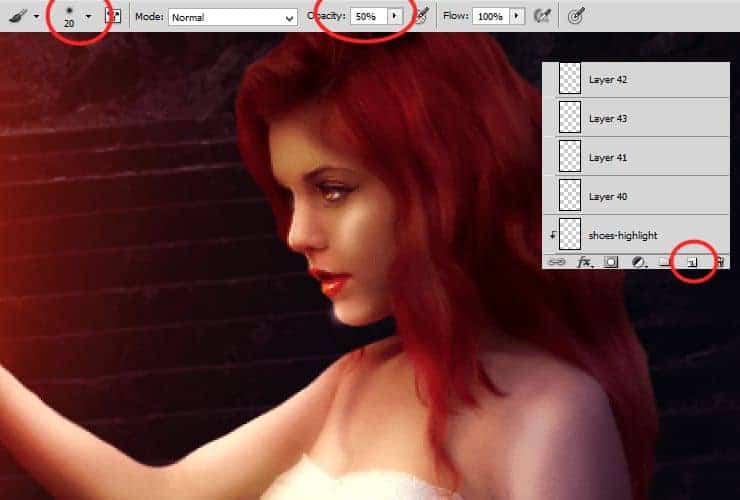
Decrease its opacity to around 50%.
Step 63
Okay. Go above all layers and add new layer (Shift+Ctrl+N or shortcut). Make the same thing as in step 60. Create outline of model’s body, by using the same color sheme as in this step.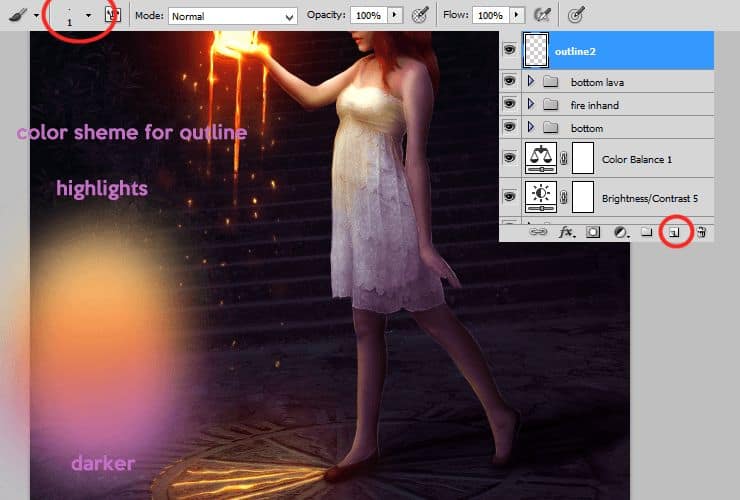
Step 64
Add falling particles around model. Add new layer (Shift+Ctrl+N or shortcut). Set #fffc82 – light yellow color in your color picker. Choose small, hard round brush and draw smaller particles by strokes of brush. You can also use “Rough Round Bristle” brush from Adobe Photoshop preset. It’s also good for making particles. If you want, you can also use every dust or particle brush, you want.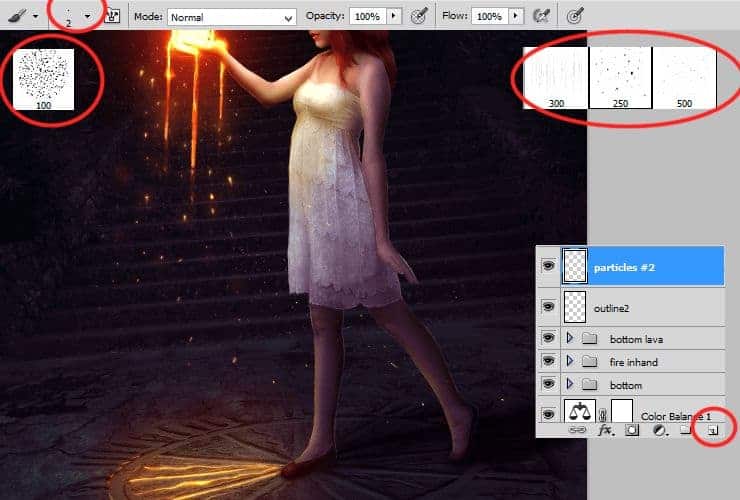
Right click on this layer and choose “Blending options…”.
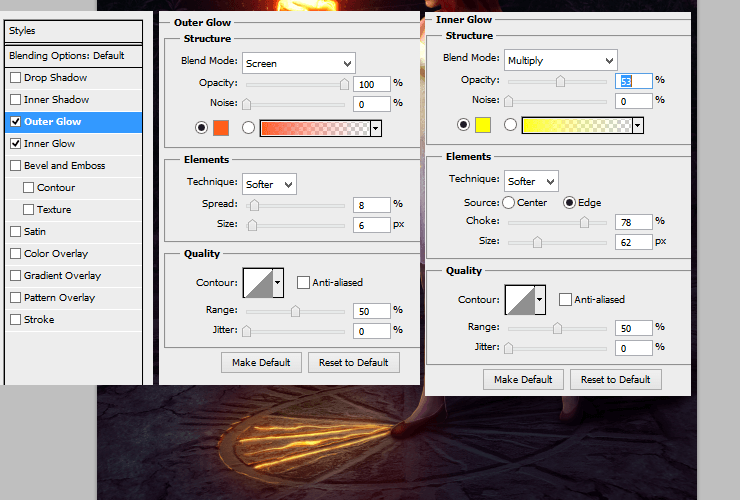
Step 65
It will take much time. Add new layer (Shift+Ctrl+N or shortcut). Create violet outline on background, by using 1px soft round brush.
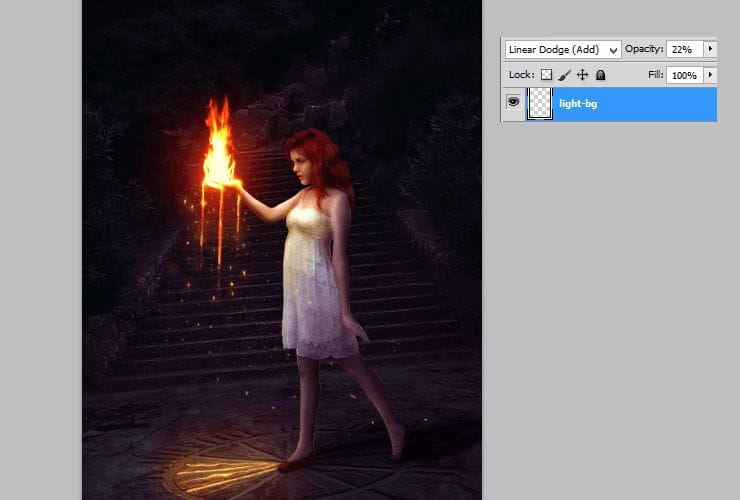
Step 66
Add new layer (Shift+Ctrl+N or shortcut). For making the effect of depth, draw some lights on background. Use soft round brush, around 50px with the same color.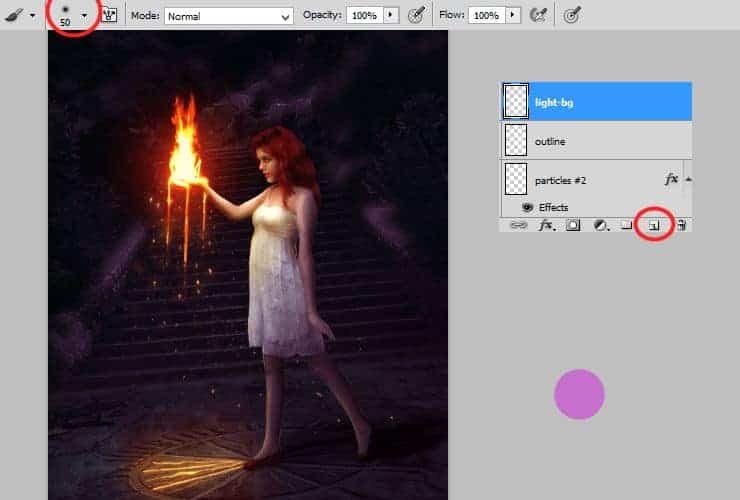
Change blending option to “Linear dodge (Add)”. Decrease opacity to 22%.
Step 67
Add new layer (Shift+Ctrl+N or shortcut). You’ll make something swoosh-like from particles. Use big, soft round brush with opacity around 30%. Use colors from #f9f26c to #f9d16f. Draw arc.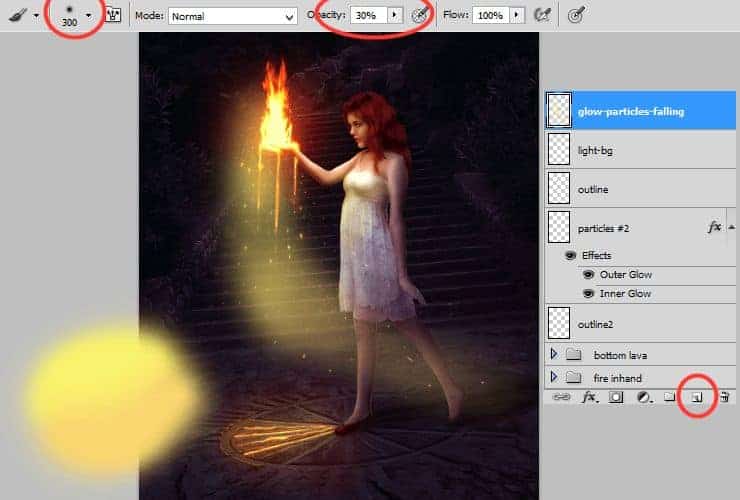
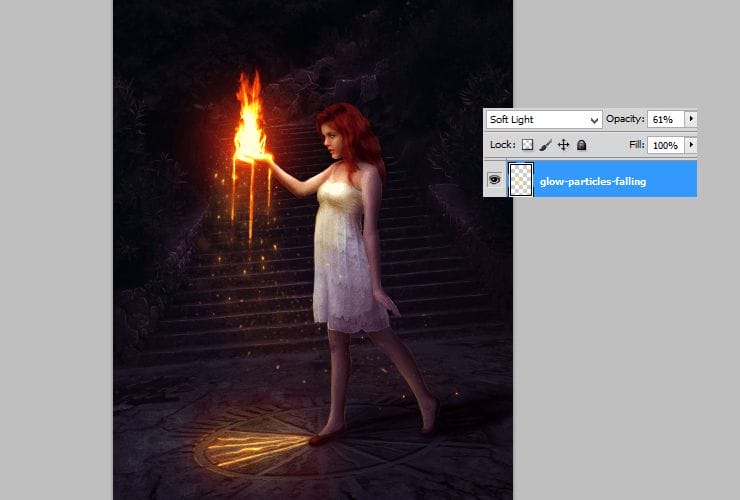
Change blending options – Soft light, opacity to 61%.
Step 68
Place “Dead tree png” stock to your file. Duplicate it (drag and drop on “New layer” symbol or go to Layer > Duplicate layer…) and go to Edit > Transform > Flip horizontal. Set it as is shown. Then, mark “Dead tree” layers by holding ctrl and then, right click on it. Choose “Convert to Smart Object”.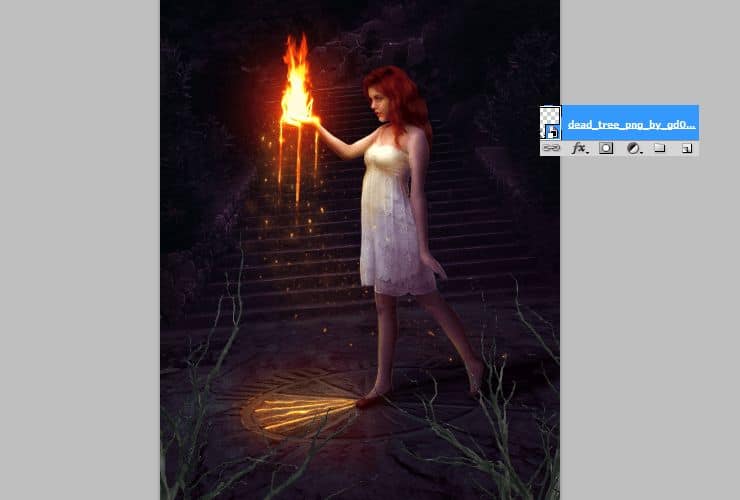
Step 69
Things on first plan should be blurred, to get depth of field effect. Go to Filter > Blur > Gaussian blur.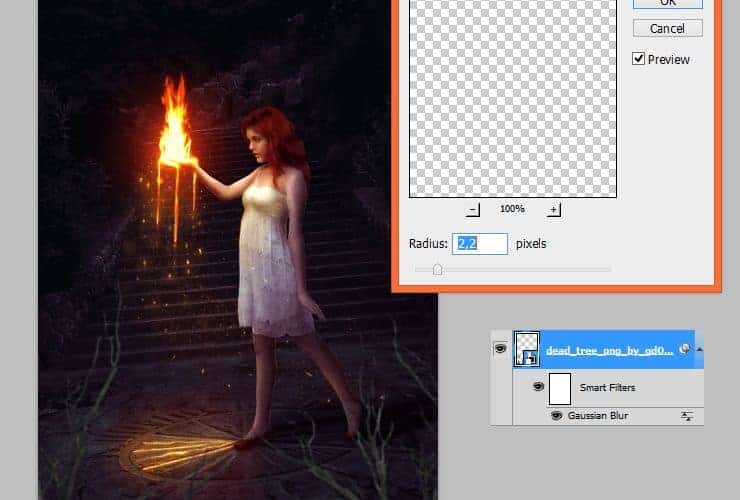
Step 70
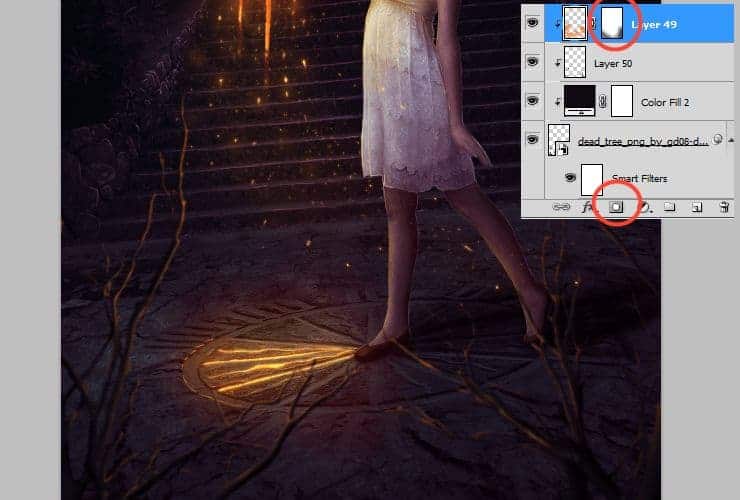
Add adjustment layer with color fill – #0e0912. Right-click on adjustment layer and choose “Create clipping mask” (Alt+Ctrl+G or Layer > Create Clipping Mask)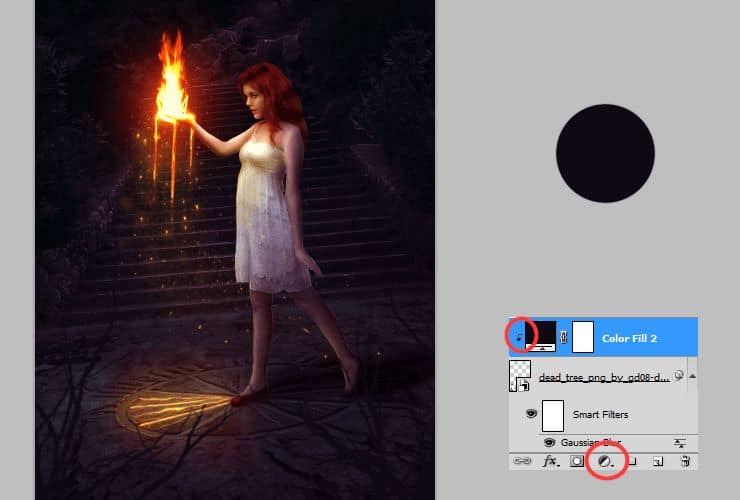
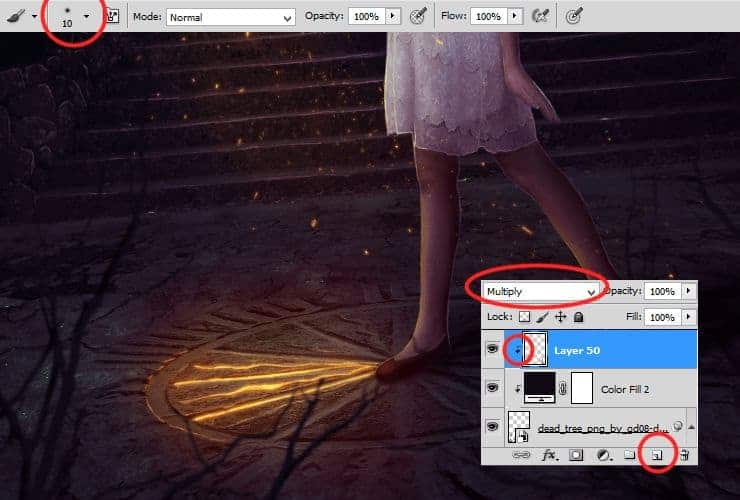
Now it’s time to make lights on trees. Add new layer (Shift+Ctrl+N or shortcut). Right-click on this layer and choose “Create clipping mask” (Alt+Ctrl+G or Layer > Create Clipping Mask). Use the same brush, with dynamic opacity. Draw lights with #ffaa23 (orange) color.
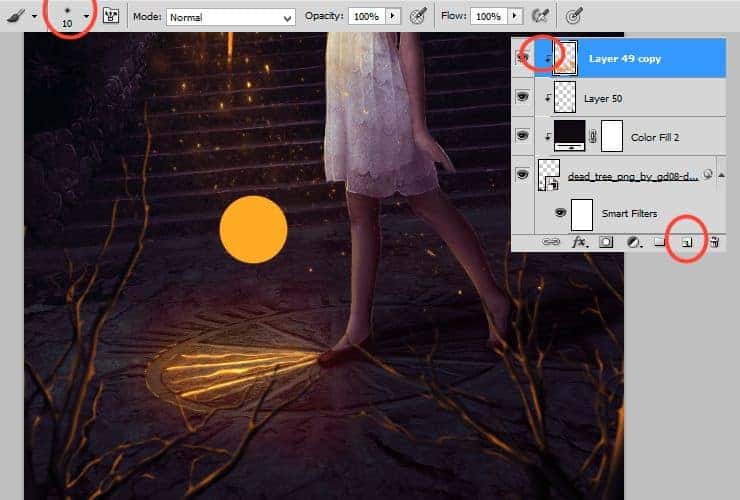
If it’s needed, add layer mask. Click on marked shortcut. Use big, soft round brush and erase unwanted parts.
Step 71
Make the same steps with stock image “Tree sidebar png”. Blur it. At first – color fill (step 70), then I added Hue/Saturation adjustment layer (Hue: 266, Saturation: 44), then, I drew lights with the same color and way as in step 70b.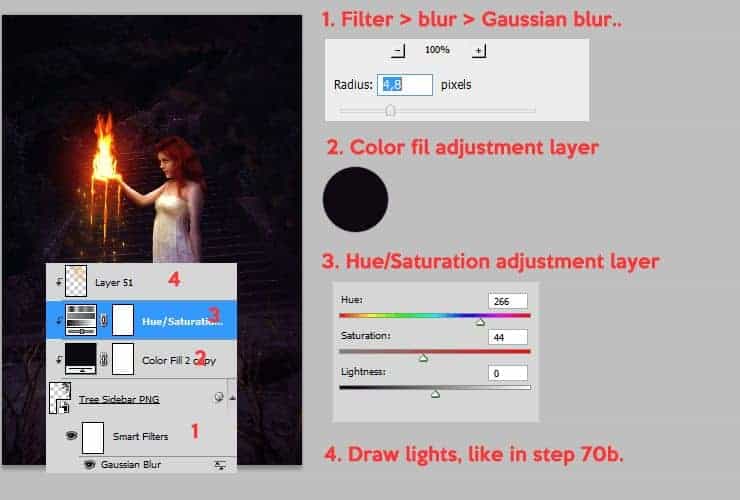
Step 72
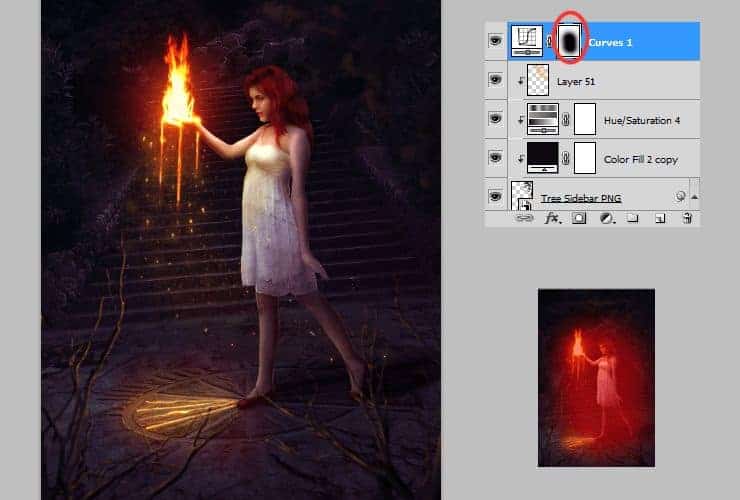
Add new adjustment layer with Curves.
Then, with big soft round brush mask curves adjustment layer as is shown.
Step 73
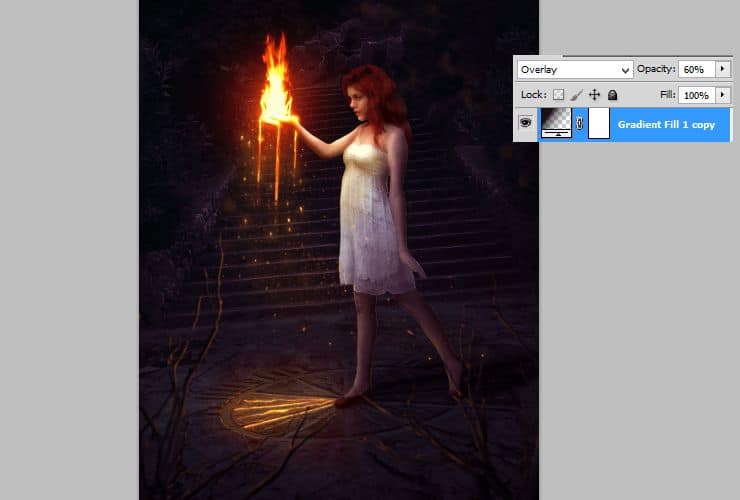
Now it’s time to make Gradient fill adjustment layer (Layer > New adjustment layer…). Use transparent-#0e0912 radial gradient.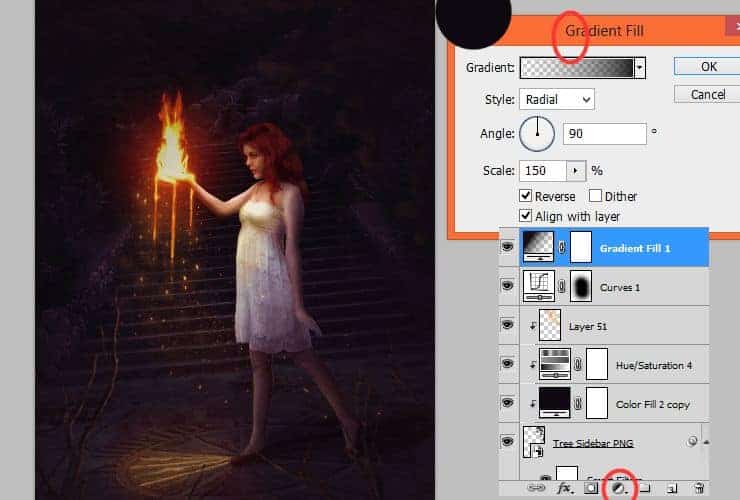
Change blending mode to Overlay, decrease its opacity to 60%.
Step 74
Add new layer (Shift+Ctrl+N or shortcut). Pick soft round brush around 300px and choose the same color as before – #0e0912 Draw around edges of image.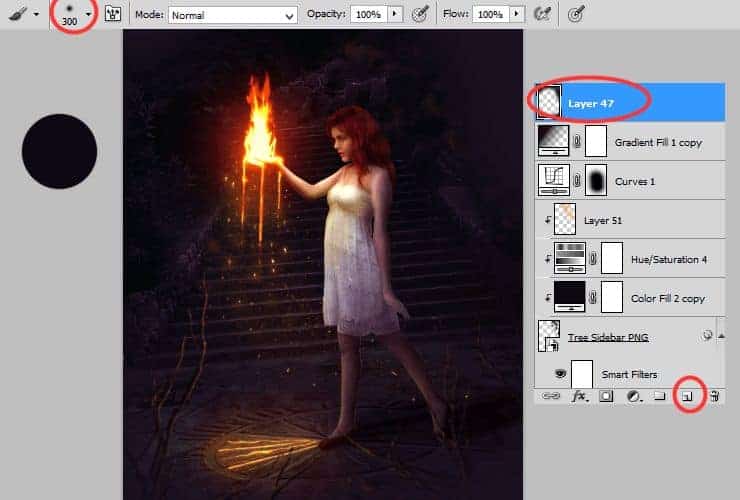
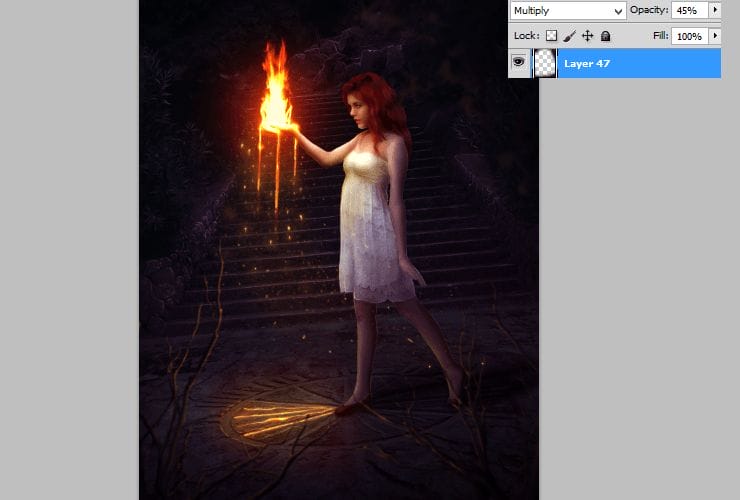
Make this layer to Multiply, 45%.
Step 75
Now, it’s time to fix Exposure. Add Exposure adjustment layer (Layer > New adjustment layer…).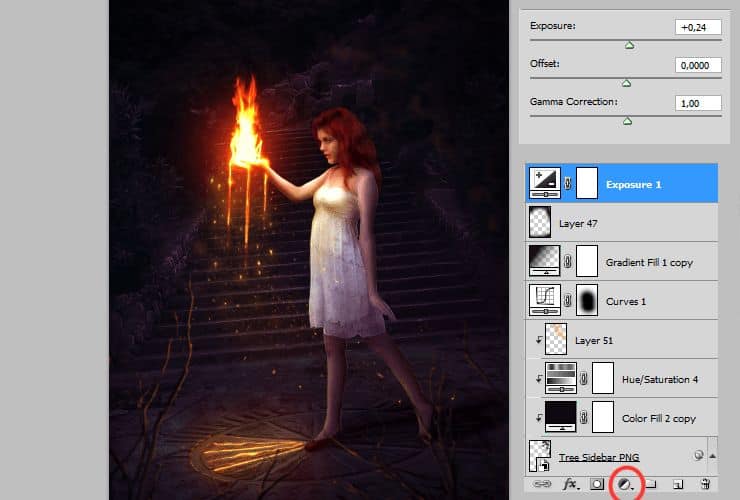
Step 76
Add new layer (Shift+Ctrl+N or shortcut). You’ll create hair. Pick soft round brush with dynamic opacity (1px size). Use the similar color sheme as in step 60. It will be your base to next steps.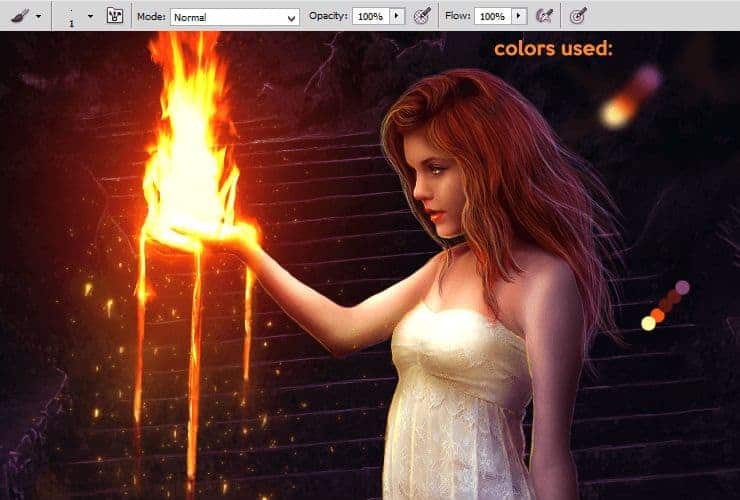
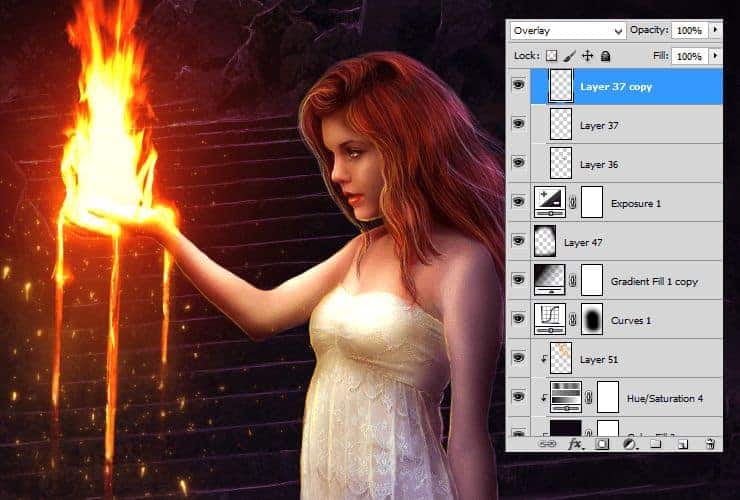
Add new layer (Shift+Ctrl+N or shortcut). Pick soft round brush with 50% opacity. Use white color. Draw highlights on curls.

Change its opacity and blending mode – to Overlay. If you think, that effect isn’t visable yet, you can duplicate this layer – drag and dtop it to “New layer” symbol, or go to Layer > Duplicate layer…
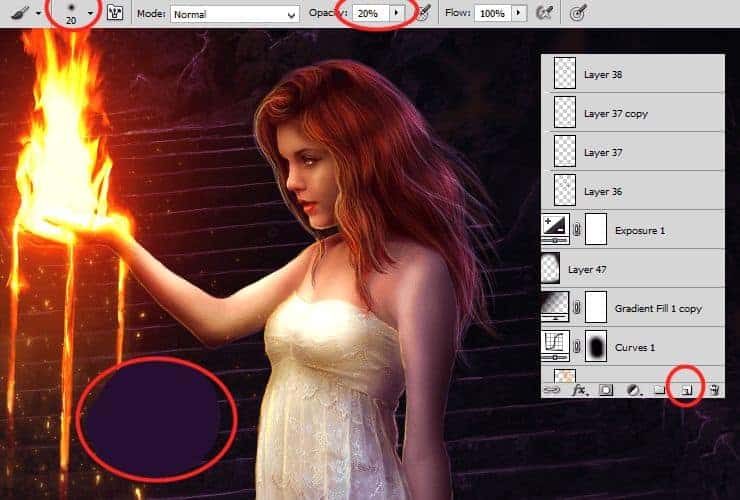
Add new layer (Shift+Ctrl+N or shortcut). Use soft round brush, with opacity around 20%. Set dark-violet color and draw shadows of curls.
Final Results

How to Create a Fantasy Photo Manipulation with Fire
 Reviewed by Unknown
on
6:23 AM
Rating:
 Reviewed by Unknown
on
6:23 AM
Rating:


No comments: