
Combine fire
In this advanced tutorial you’ll make a dramatic photomanipuation of a burning fist with photoshop fire effects. You’ll learn how to make burning effect in photoshop, including create cracked skin textures, particle effects, scorched and burnt skin, glowing embers, smoke and flame effects.
This is an intermediate level tutorial, so a fair level of competence in Photoshop is necessary in order to progress through it.
Step 1: Creating the background
For this tutorial we will be using an arm stock photo that can be downloaded here: http://konzi.deviantart.com/art/Fist-06-304291216.
With the photo open in Photoshop, take the Quick Selection Tool and use it to drag a selection over the arm and fist.
Go to Select > Refine Edge, and use the sliders to tighten up the selection, as I have in the image below.

You can now Invert the selection, and delete the background.

Go to Image > Canvas Size, and change the dimensions to 1500 x 2100.


Use a dark grey (#1d1d1d) to light grey (#e6e6e6) gradient, and move the gradient layer below the arm layer.

Click on the black colour picker button and then click on the darkest area of the hand. Similarly, click on the white colour picker and then click on the lightest part of the hand.
Right click on the Curves layer and choose Create Clipping Mask to constrain the adjustments to just the pixels in the arm layer.

Step 2: Darkening the skin
We have already covered how to change skin colors in photoshop before so this is a recap. Add a Color adjustment layer with a clipping mask. Then with the layer’s layer mask thumbnail selected go to Edit > Fill and fill it with black to mask out the layer.


Fill the layer mask with black, and then take a large soft white brush, and paint over the hand area. THis is how to darken an image in photoshop.

Step 3: Adding the cracked effect in photoshop
To create a cracked texture across the hand we’ll use a cracked paint texture that can be downloaded here: http://www.cgtextures.com/texview.php?id=7604&PHPSESSID=qg4aqfadrm86hctpn5ki9na1j4With the texture open in Photoshop, go to Image > Adjustments > Desaturate.

Next add a Curves adjustment layer and use the black colour picker to choose a dark part on one of the cracks, and the white colour picker to click on a lighter area between the cracks.

This will select all the dark areas of the image i.e. the cracks. Copy the selection, and paste it into your project.

Duplicate the layer, call the top layer ‘cracks’, and the bottom layer ‘cracks glow’, and give them both clipping masks and layer masks.

Step 4: Creating a glow effect in photoshop
Hide the ‘cracks’ layer for now, and double click on the ‘cracks glow’ layer to bring up the Layer Styles dialog box.Click on Color Overlay, and set the colour to white.


Click OK.

Take a large, soft white brush and paint over the hand and part way down the arm to bring the cracks back to those areas.
Use a smaller black brush to mask out any areas where the crack texture looks unnatural like the thumbnail and between the fingers.


Step 5: Adding the smoke effect in photoshop
For the smoke we will use a stock photo that can be downloaded here: http://www.cgtextures.com/texview.php?id=43649&PHPSESSID=qg4aqfadrm86hctpn5ki9na1j4. For previous smoke effect photoshop tutorials, check out how to make smoke and smoke fading effect.With the smoke texture open in Photoshop, go to Image > Adjustments > Invert.

Go to Select > Select All, then copy and paste the smoke into your project.

Use the Move Tool to position the smoke over the top of the hand.

Step 6: Creating embers
We’ll add the embers in a new layer above the smoke layer, called ‘embers’.Take a very small soft black brush and paint a few dots over the area where the smoke is. Build up more dots while varying the size of the brush.

Click on Color Overlay, and set the colour to white. Next click on Outer Glow and set the Blending Mode to Linear Dodge (Add), the Opacity to 100%, the colour to orange (#ff4e00), and the Size to 10 px.


Step 7: Adding flames effects
The last element we’ll be adding are the flames. You can download the flame texture here: http://www.cgtextures.com/texview.php?id=63915&PHPSESSID=qg4aqfadrm86hctpn5ki9na1j4With the flames open in Photoshop, make a rectangular selection over a portion of flames, then copy and paste the selection into your project.


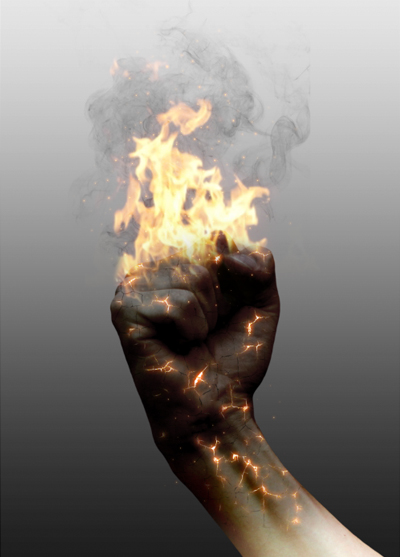
The Final Outcome
Below is how the end product will look like. Hope you will learn how to combine fire, crack and glow effect to create a cool burning image in photoshop.
Combine fire
 Reviewed by Unknown
on
9:15 AM
Rating:
Reviewed by Unknown
on
9:15 AM
Rating:
Reviewed by Unknown
on
9:15 AM
Rating:


No comments: